
Using Microsoft’s Hyper-V service with Active Directory Domain Hole Replication for authentication can be useful in the following scenarios:
Disaster Recovery Scenarios: In disaster recovery scenarios, where replication of virtual machines between remote sites is necessary, the use of self-signed certificates can facilitate configuration without depending on constant domain connectivity or the loss of one.
Enhanced Security, Compliance and Isolation: In some cases, compliance or corporate security policies may require the isolation of certain resources, making the use of self-signed certificates a valid choice for authentication without a domain and making communications between Replication servers safe from eavesdropping or manipulation.
Authentication Flexibility: Certificate-based authentication offers a flexible solution that can be easily deployed across servers even in the absence of a domain structure.
Infrastructure Simplification: For small businesses or for test scenarios where implementing and managing a complete domain would be too burdensome or complicated.
Speed of Deployment: Using self-signed certificates can speed up the process of deploying Hyper-V replication by avoiding the need to configure and manage Active Directory infrastructure. Certificate-based authentication can be easier to scale than managing a domain, especially if servers are located in different geographic locations.
While using self-signed certificates for authentication in Hyper-V replication can offer numerous benefits in these scenarios, it is important to note that certificate management such as password management must be done with care and a high level of security.
In this guide we will install and configure the Hyper-V role for virtualization on two servers on Microsoft Windows Server 2022, and proceed with enabling the replication of our Virtual Machines between our servers outside the Active Directory domain, using self-signed certificate authentication.
We will also configure a replication status control script which will send us an alert email in the event of an anomaly.
To generate certificates we can choose various options, I have chosen 3 of the most common ones.
1 – Makecert, Microsoft tool for creating self-signed X.509 certificates, contained in the Microsoft Windows Software Development Kit (SDK). Now deprecated but very simple to use.
Guide= https://learn.microsoft.com/en-us/windows/win32/seccrypto/makecert
Download = https://developer.microsoft.com/en-us/windows/downloads/sdk-archive/
2 – Powershell cmdlet New-SelfSignedCertificate, method now used and present in the Microsoft operating system.
Guide= https://learn.microsoft.com/en-us/powershell/module/pki/new-selfsignedcertificate
Download = https://learn.microsoft.com/it-it/powershell/scripting/install/installing-powershell-on-windows?view=powershell-7.4
3- OpenSSL, the most used tool especially in the extremely flexible Linux world
Guide = https://www.openssl.org/docs/
Download = https://slproweb.com/products/Win32OpenSSL.html
You can find all the example files and My scripts on my github reposytory https://github.com/thelogh/self-signed-certificate-replica-Hyper-V.
We will therefore proceed with these steps:
– Installation of Hyper-V role on 2 servers with Microsoft Windows Server 2022 already present in the installation
– Creating certificates via Makecert (faster but obsolete method)
– Creating certificates via Powershell
– Creation of certificates via OpenSSL
– Configuring replication between two servers
– Creation of replication control scripts
1 – Step Install Windows Server 2022 and configure the Hyper-V role.
We start from the assumption that we have a basic installation of Microsoft Windows Server 2022 already functioning on both machines.
The first thing to do is rename the server and assign a static IP address.
We will assign the name “HyperV-1” to the first server with IP 192.168.44.1 and to the second server the name “HyperV-2” assigning IP 192.168.44.2.
ATTENTION THE SERVER NAME WILL BE USED TO CREATE THE CERTIFICATE!
If we change the name we would have to start over with the creation of the certificates and the Replication configuration.
The second operation to do, also very important, is to force the resolution of the server name (HyperV-1 or HyperV-2) on the previously assigned static IPs. Since the servers will be configured to be domain independent, there is a possibility that they will not use the Active Directory Domain DNS, but could also use public DNS. So it would be impossible for them to resolve the name of the replica host, so the only way is to force the resolution by editing the Windows hosts file for each server we use.
For each of our servers we will edit its hosts file.
Let’s edit the file “C\windows\system32\drivers\etc\hosts” with Administrator permissions. We run the command:
notepad.exe C:\windows\system32\drivers\etc\hostsAnd insert the IP and NAME inside respectively, separated by a space, as in the following example.
192.168.44.1 HyperV-1
192.168.44.2 HyperV-2
In this case we specify both itself and the secondary server or multiple servers if there are any.
Naturally, in the case of multiple IPs, the one with which the two or more Hyper-V servers will use to send the replication traffic between them must be entered.
Perform the same procedure on the second server
192.168.44.2 HyperV-2
192.168.44.1 HyperV-1
Verify that the name resolution is correct using the ping command
ping -4 HyperV-1
ping -4 HyperV-2
If everything has been done correctly it should return the IP assigned in the host file. Also perform the check on the second server.
Let’s proceed with the installation of the service on our main server (HyperV-1).
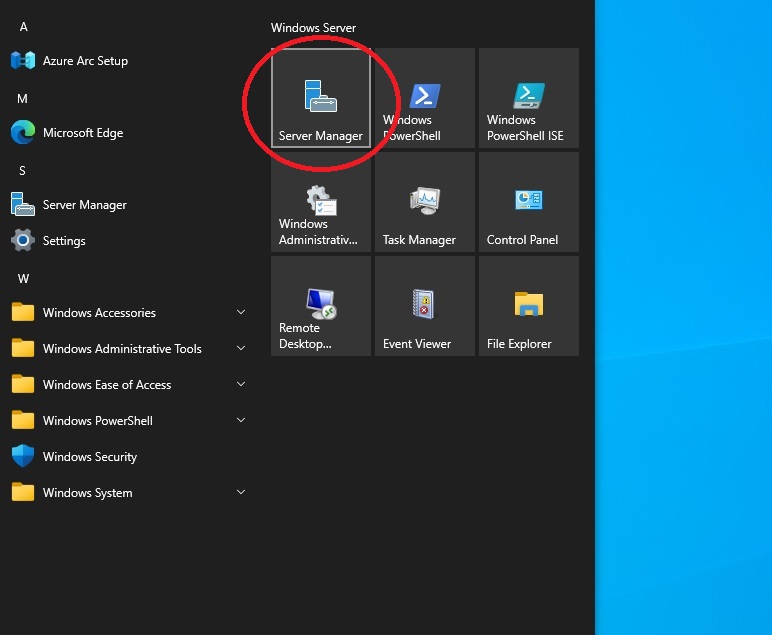
Let’s open the Server Manager
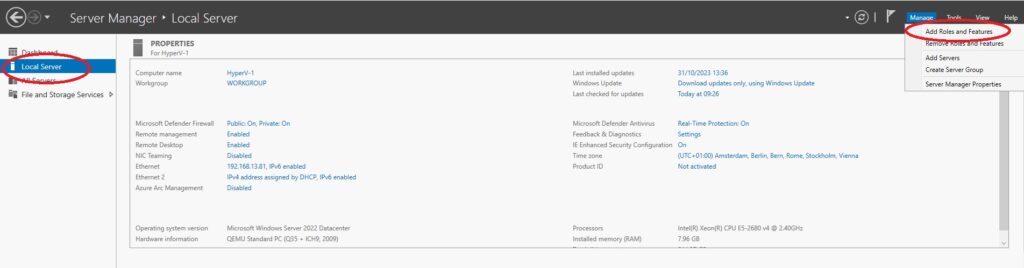
We select “Local Server” on the left menu, then at the top right we click on the “Manage” menu and click on “Add Roles and Features”.
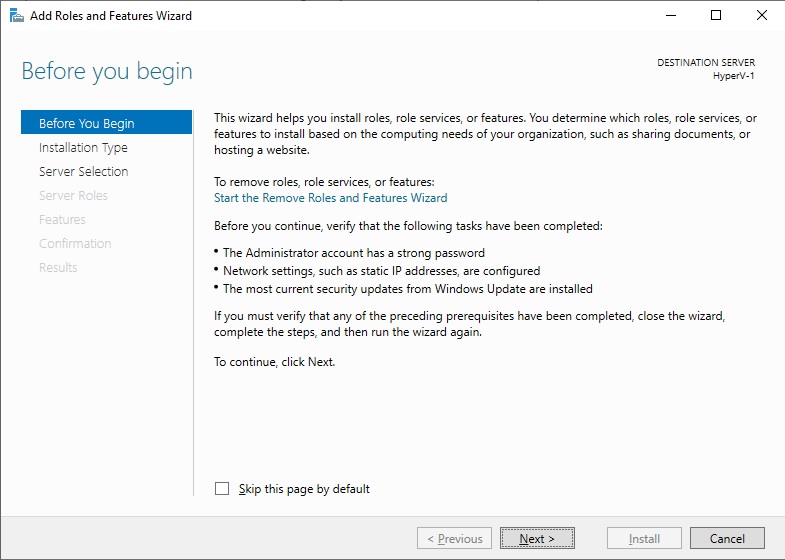
A Wizards will open, click on Next.
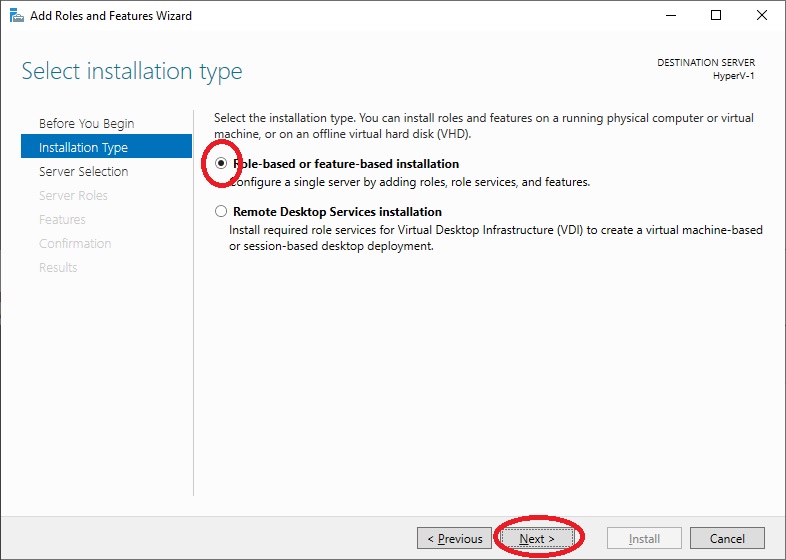
Leave the “Role-based or feature-based installation” option selected, and click “Next”.
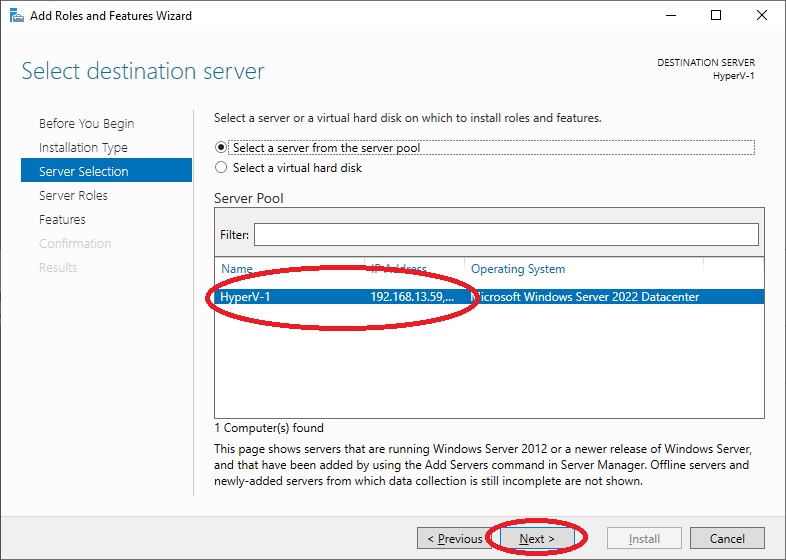
We check that our Server is selected and click on “Next”.
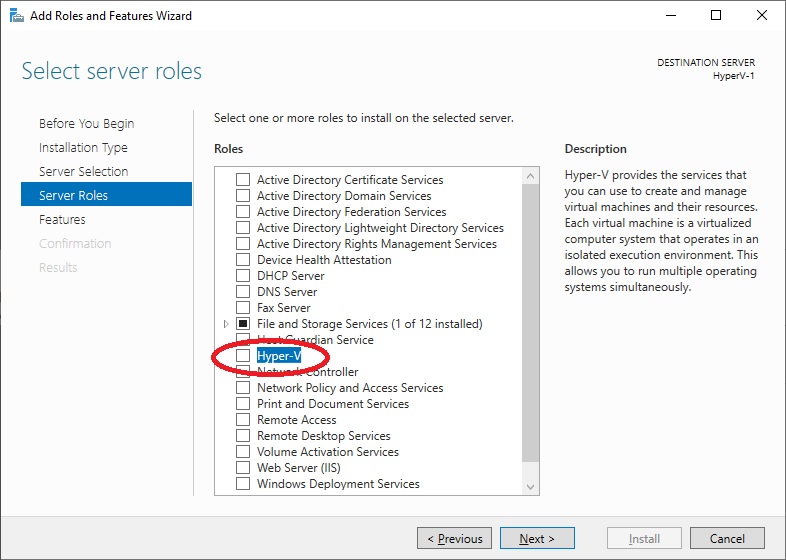
A list of services to install will appear, check the “Hyper-V” option.
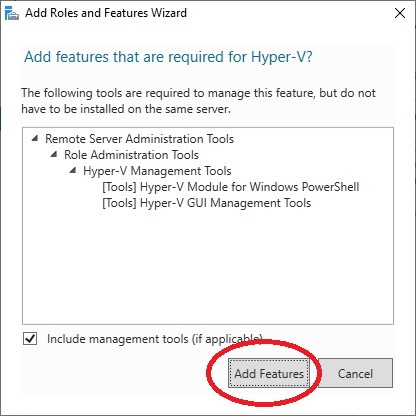
Another menu will open with a list of additional features to install, click on “Add Features“.
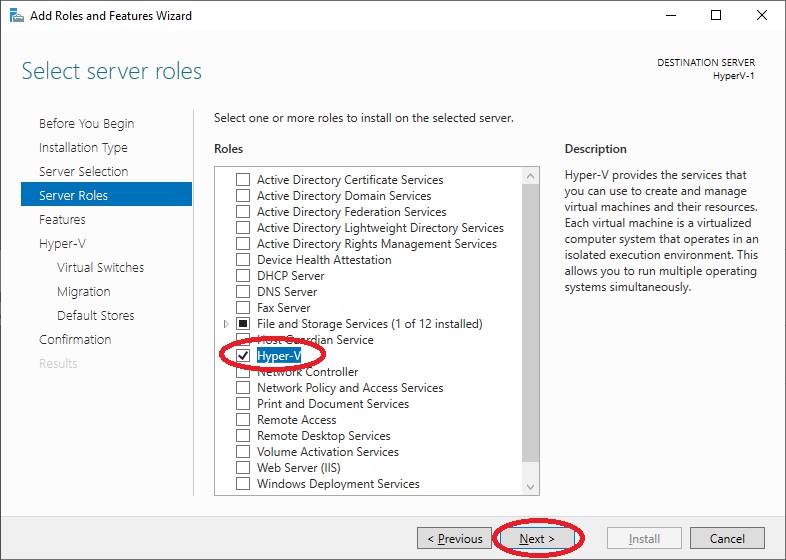
Once we return to the previous menu, we verify that the “Hyper-V” Server Role is selected and click on “Next“.
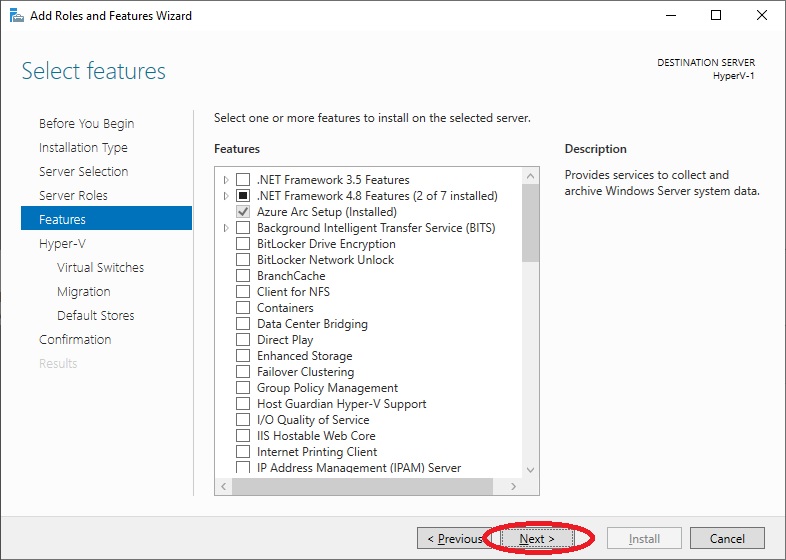
Then in the next menu with the list of additional “Features” to install, leave everything default and move forward by clicking on “Next“. Or if there were Windows-based VMs we could install “Windows Server Backup“. But we will dedicate a separate article to it.
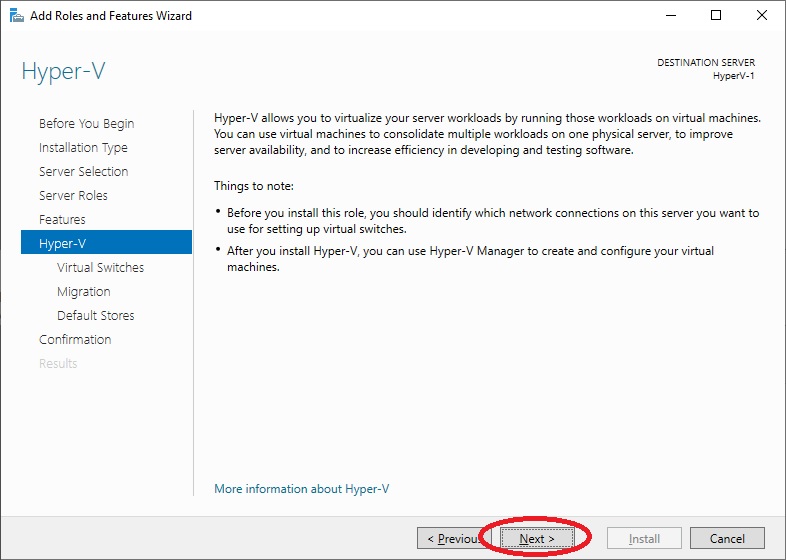
The next menu “Hyper-V” warns us that we should configure the settings for the network dedicated to our VMs, go ahead by clicking on “Next“.
A list of available network adapters that you can use in Hyper-V will appear.
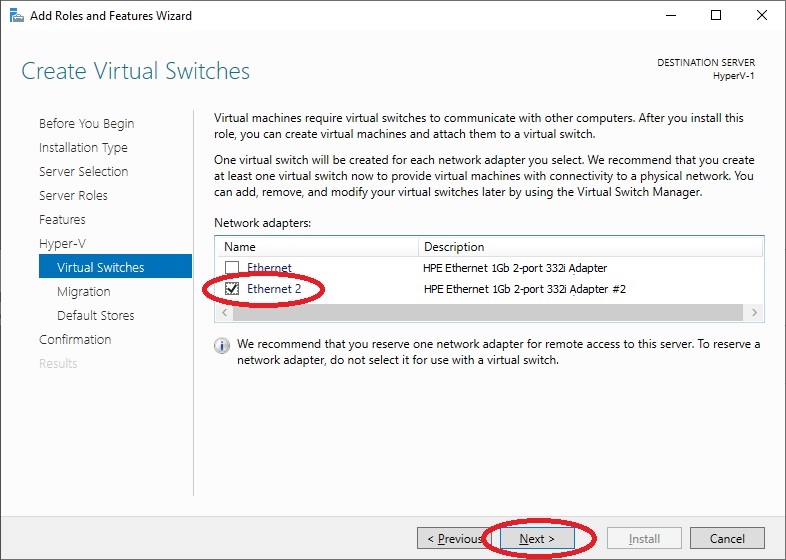
ATTENTION It is important not to use the main network card, but an additional one. Better if multiple network cards in LACP “NIC Teaming” bonding. Because in case of high traffic of our VMs with the link saturated, we would no longer be able to access our server remotely.
Furthermore, the IP configuration of the selected network card, if present, will be removed.
We select our card and move forward by clicking on “Next“.
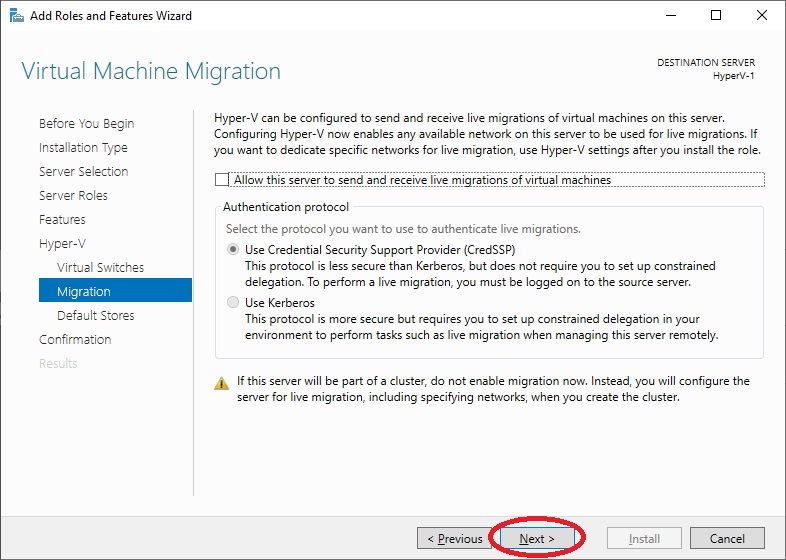
It will ask us if we want to enable “Live Migration“, let’s leave everything as is and move on.
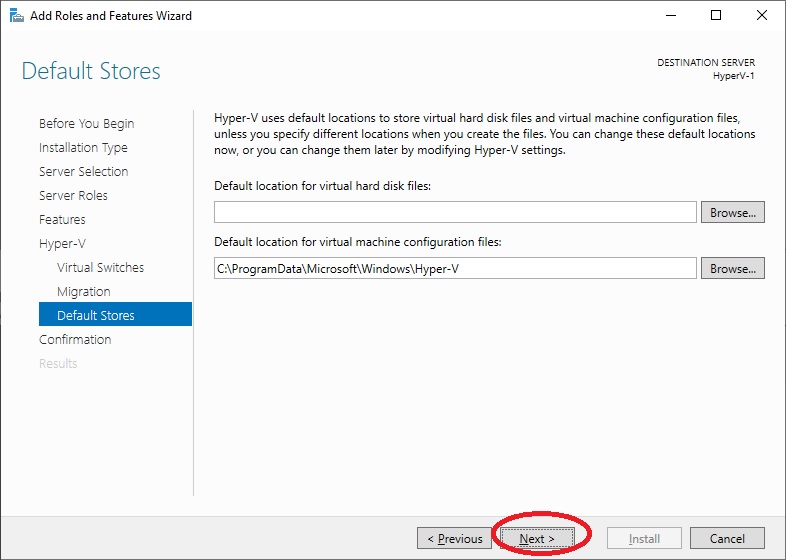
Now we can specify the default directory where all the data of our “Virual Machines” will be stored, such as the VM configuration file, the associated virtual disks and any disk snapshots. The ideal would be not to use the same system disk, but additional disks, perhaps SSD or SAN.
So as not to impact the operation of the server itself in the case of high I/O. In our case we leave the default setting and move on to “Next“.
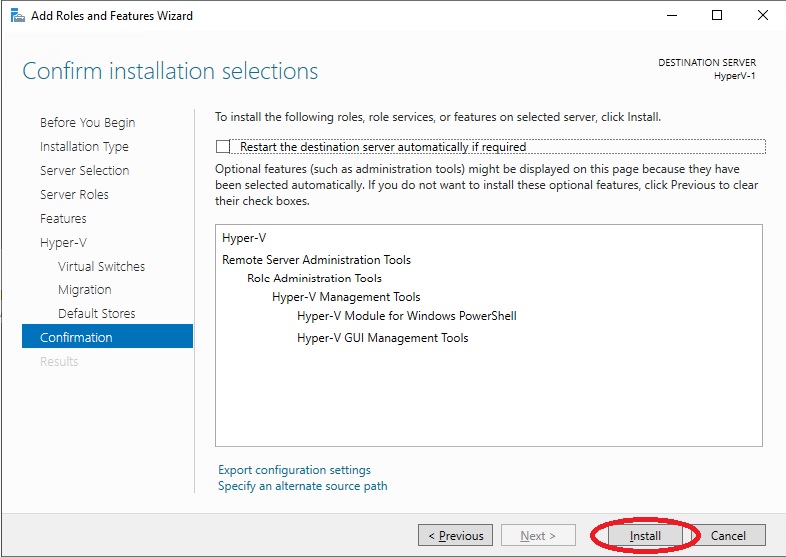
We will be offered a summary of the components that will be added, click on “Install“
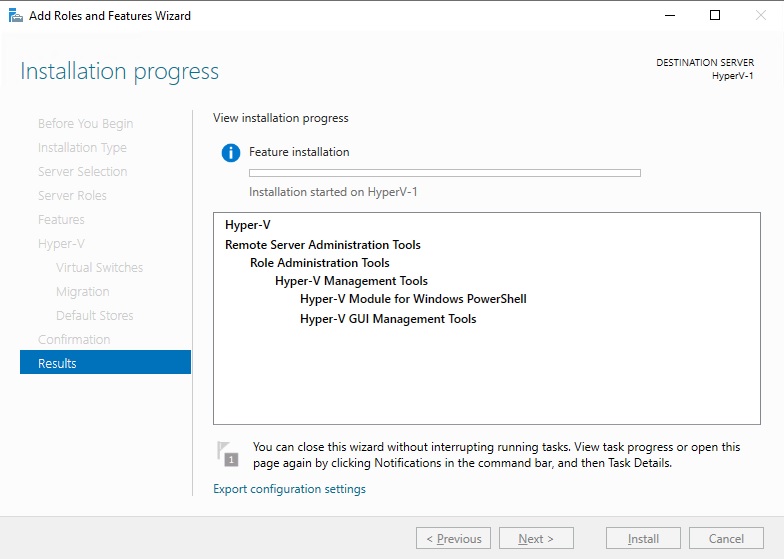
We wait for the components to be installed.
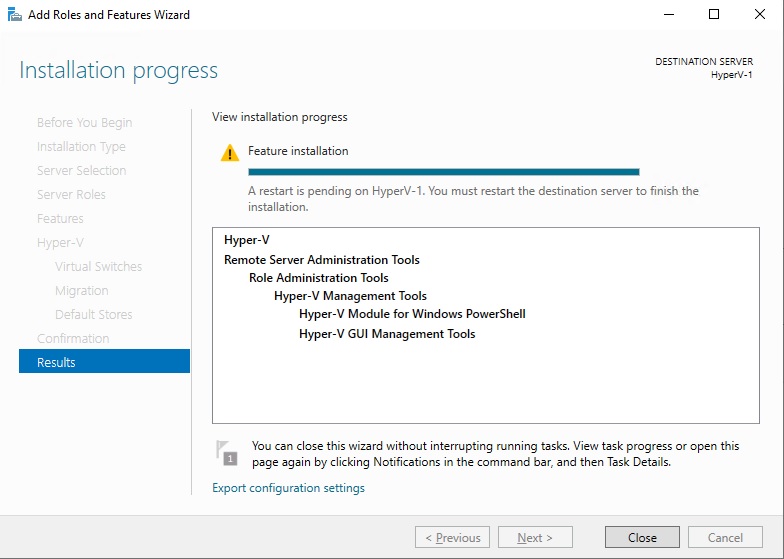
After that it will ask us to restart the server.
Once the server has been restarted, we go to “Control Panel” > “Administrative Tools“.
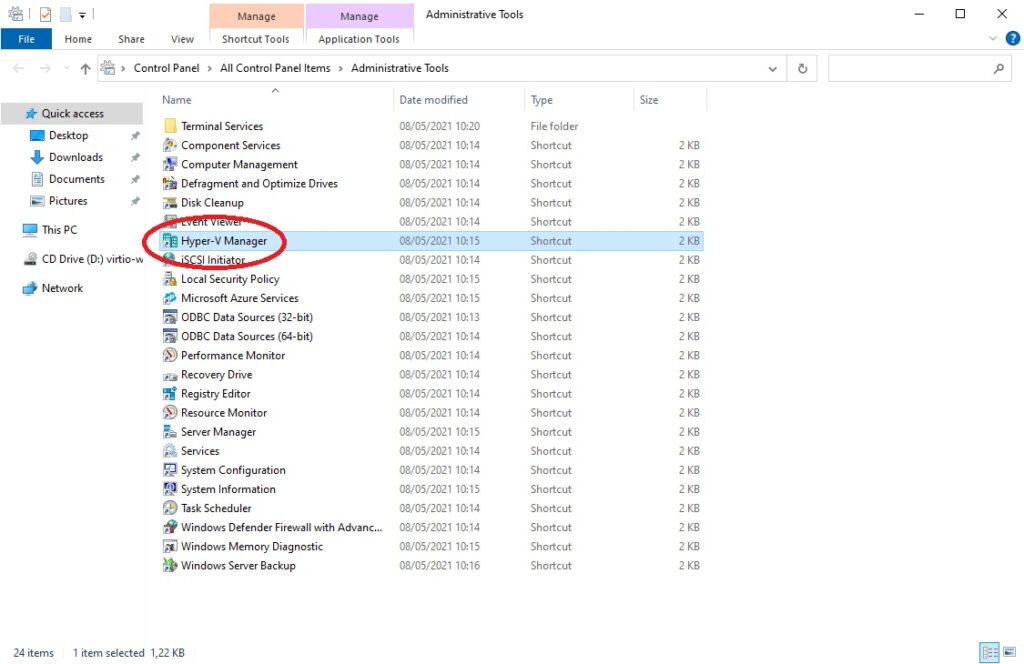
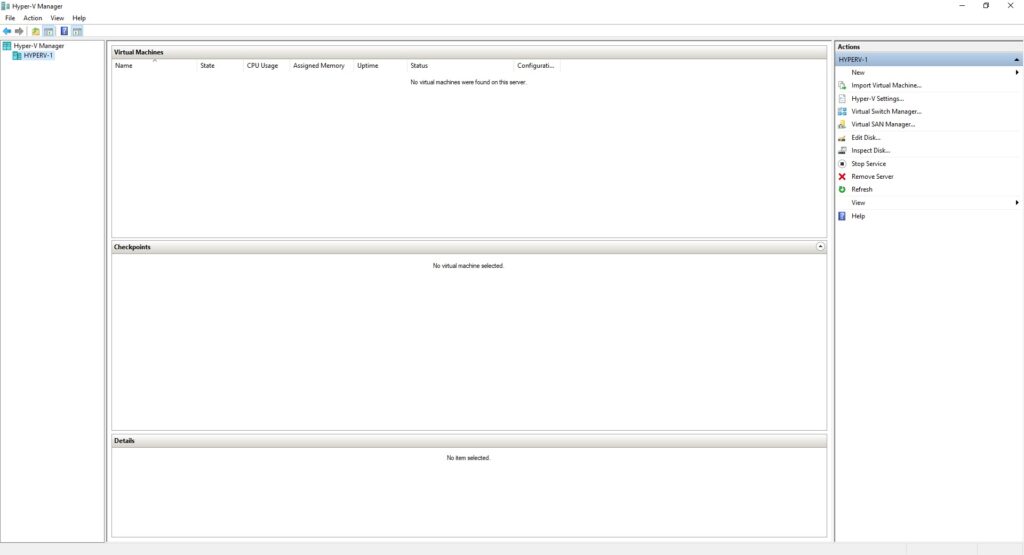
Click on “Hyper-V Manager“. If everything is successful, the Hyper-V administration interface will appear.
At this point we prepare the Hyper-V service for the use of self-signed certificates, by default these cannot be used but there is a registry key to modify in order to use them.
So we are going to modify some registry keys.
Open a command prompt always as “Admnistrator” and run these commands:
reg add "HKLM\SOFTWARE\Microsoft\Windows NT\CurrentVersion\Virtualization\FailoverReplication" /v DisableCertRevocationCheck /d 1 /t REG_DWORD /f
reg add "HKLM\SOFTWARE\Microsoft\Windows NT\CurrentVersion\Virtualization\Replication" /v DisableCertRevocationCheck /d 1 /t REG_DWORD /f
We enable the pre-configured rule for communication of the Hyper-V Replica HTTPS Listener service, port 443, protocol TCP, in the “Windows Defender Firewall“. We open Powershell with administrator privileges and issue the command:
Enable-Netfirewallrule -DisplayName 'Hyper-V Replica HTTPS Listener (TCP-In)'Let’s check if the rule is enabled with the command:
Get-Netfirewallrule -DisplayName 'Hyper-V Replica HTTPS Listener (TCP-In)'Restart the server to apply the changes to the service.
Now we should be ready to create our certificates, but first perform the same installation and configuration procedure on our second server (HyperV-2), which will receive the Replicas from the main Server (HyperV-1).
Once the servers are configured and active, we proceed with the creation of the certificates used by the “Replication” service for authentication (HTTTS) instead of Kerberos (HTTP).
As mentioned previously we have the possibility of creating certificates in multiple ways, I will give you an example for Makecert, Powershell and OpenSSL.
IMPORTANT
First of all we can decide whether to create a single Certification Authority (CA) on a single server (Example Hyper-V-1) and from there generate the (authentication) certificates for itself (Hyper-V-1) and for each server (Hyper -V-2, Hyper-V-3, etc..) which will have to use the Hyper-V service, and then import the Certification Authority and the generated (authentication) certificate on the remaining servers (Hyper-V-2, Hyper- V-3, etc.). By inserting the Hyper-V-1 Certification Authority (CA) into the certificate trust on each additional server (Hyper-V-2, Hyper-V-3, etc.).
Or on EVERY SINGLE server we will generate a Certification Authority (CA) and from it we will generate the (authentication) certificate for the Hyper-V service only for itself. So “Certification Authority” HyperV-1, “server” certificate (authentication) HyperV-1, “Certification Authority” HyperV-2, “server” certificate (authentication) HyperV-2, “Certification Authority” HyperV-3, “server” certificate (authentication) HyperV-3, etc. …
We will export Certification Authority (CA) on the server that generated it and import it into the other servers by inserting it into the certificate trust.
In the certificate generation example we will use the second method, a CA for each server that generates a single server certificate for authentication.
Attention! The type of server certificate to be used for authentication must contain these “Enhanced Key Usages”:
Server Authentication (1.3.6.1.5.5.7.3.1)
Client authentication (1.3.6.1.5.5.7.3.2)
Server Certificates are used to identify a server. And they are used using the server name (hostname), which is why as previously mentioned it will not be possible to change the server name without necessarily regenerating the certificates with the new name.
The generated and imported Server certificate must contain the “PRIVATE KEY” inside!!!
1 – Makecert
Microsoft tool for creating self-signed X.509 certificates, contained in the Microsoft Windows Software Development Kit (SDK). Now deprecated but very simple to use, downloadable from the link https://developer.microsoft.com/en-us/windows/downloads/sdk-archive/, contained within the “Windows SDK for UWP C++ Apps” of the “Windows SDK for Windows 11” (even in lower versions), in the path “C:\Program Files (x86)\Windows Kits\10\bin\10.0.22621.0\x64”, or you can download the executable directly from my github repository here https://github.com/thelogh/self-signed-certificate-replica-Hyper-V.
Let’s go to the main server (HyperV-1)
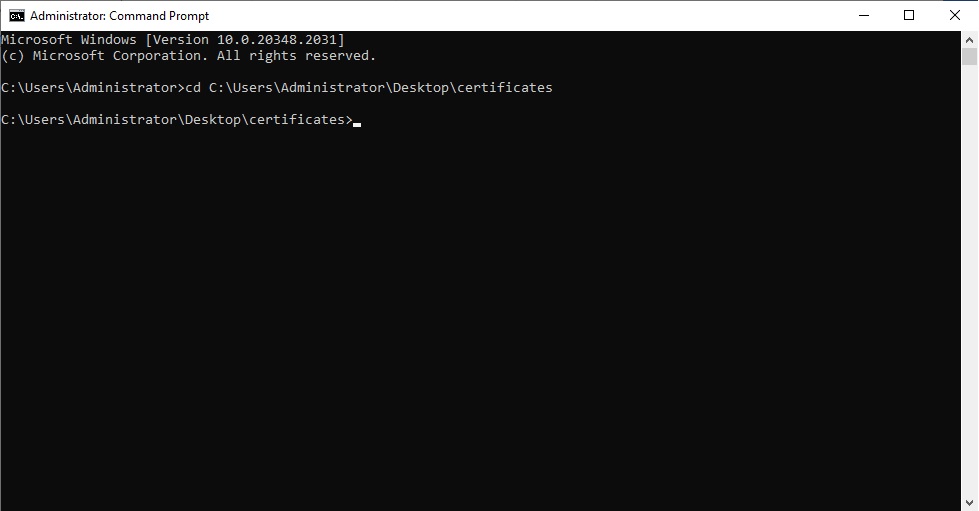
Let’s create a folder where we can place MakeCert.exe and save the generated certificates. For example, on the desktop we create the “certificates” folder, the path will therefore be “C:\Users\Administrator\Desktop\certificates“.
We copy the MakeCert.exe executable inside it, and open a command prompt in that folder to launch the executable.
Let’s start with the creation of our Certification Authority. In this case we will call it “HyperV-1-CA“, with expiration “01/01/2050””.
We run the command:
makecert -pe -n "CN=HyperV-1-CA" -ss root -sr LocalMachine -sky signature -r "HyperV-1-CA.cer" -e 01/01/2040With this single command we created a new Certification Authorities, we inserted it in the “Trusted Root Certification Authorities\Certificates” of the “LocalMachine”, with expiration “01/01/2040”, and finally it was saved in the “C:\Users\Administrator\Desktop\certificates\” folder on certificate with name “HyperV-1-CA.cer” which we should import to the “HyperV-2” or “HyperV-3” server, etc.
Let’s now move on to creating the certificate to be used for the Hyper-V service that we will sign with the newly created CA.
We run the command:
makecert -pe -n "CN=HyperV-1" -ss my -sr LocalMachine -sky exchange -eku 1.3.6.1.5.5.7.3.1,1.3.6.1.5.5.7.3.2 -in "HyperV-1-CA" -is root -ir LocalMachine -sp "Microsoft RSA SChannel Cryptographic Provider" -sy 12 HyperV-1.cerWe have just created a certificate for “HyperV-1” host (CN=HyperV-1) signed by the “HyperV-1-CA” CA, with the “Server Authentication (1.3.6.1.5.5.7.3.1)“, “Client authentication ( 1.3.6.1.5.5.7.3.2)“, to insert it into the list of personal certificates, and save a copy in the “C:\Users\Administrator\Desktop\certificates\” folder.
Let’s position ourselves on the second server (HyperV-2)
And we repeat the procedure for the CA:
makecert -pe -n "CN=HyperV-2-CA" -ss root -sr LocalMachine -sky signature -r "HyperV-2-CA.cer" -e 01/01/2040And for the server certificate:
makecert -pe -n "CN=HyperV-2" -ss my -sr LocalMachine -sky exchange -eku 1.3.6.1.5.5.7.3.1,1.3.6.1.5.5.7.3.2 -in "HyperV-2-CA" -is root -ir LocalMachine -sp "Microsoft RSA SChannel Cryptographic Provider" -sy 12 HyperV-2.cerWe go to the HyperV-1 server, and copy the HyperV-2 server CA file (HyperV-2-CA.cer) into “C:\Users\Administrator\Desktop\certificates\” , and again from the prompt we import it into the list of Trusted CAs with the command:
Certutil -addstore root "HyperV-2-CA.cer"We perform the same procedure to do the reverse, copy the CA of the HyperV-1 server (HyperV-1-CA.cer) into the HyperV-2 server and import the CA with the command:
Certutil -addstore root "HyperV-1-CA.cer"Check that the certificates have appeared using the certlm.msc command, you can find a guide to view the uploaded “Current user” certificates and the “Local Computer” certificates of the server at this address:
https://learn.microsoft.com/en-us/dotnet/framework/wcf/feature-details/how-to-view-certificates-with-the-mmc-snap-in
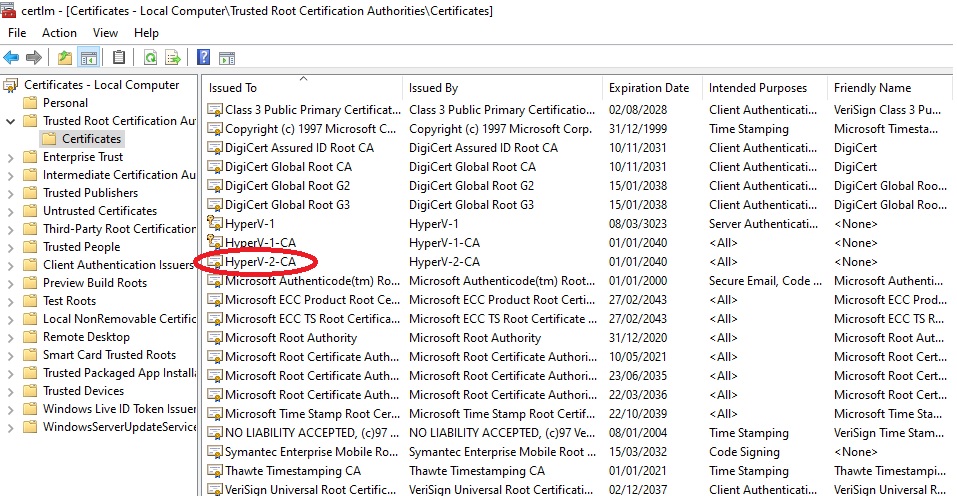
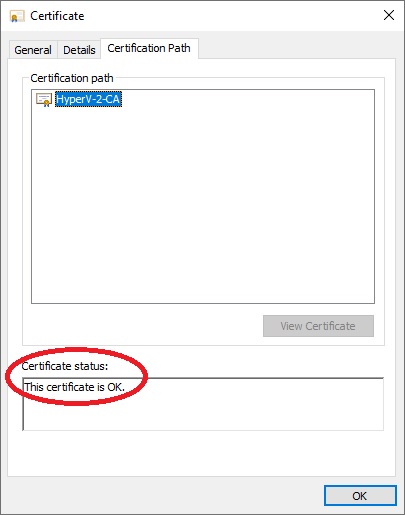
We click on the CA certificate of the newly loaded server “HyperV-2-CA.cer”, a menu will open, click on “Certification Path”, in the “Certificate status:” field “This certificate is OK” must appear.
With a few commands as we saw via makecert.exe we created and inserted our certificates into the trust. Now all we have to do is configure the replication to use certificates in authentication.
Attention! During the creation of the certificate the “Private key“ is automatically inserted into the “Windows KeyStore” and not exported! No problem if the CA created is for the server from where you execute the command (HyperV-1), but if it is for another server (HyperV-4), then in the installation of the CA certificate on the server (HyperV-4) we must also insert the “Private key to allow the generation of any future certificates.
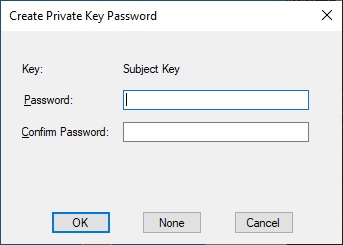
To use our own “Private key” or generate it on the spot if it does not exist and save it in a file, we modify the command by adding -sv:
makecert -pe -n "CN=HyperV-1-CA" -ss root -sr LocalMachine -sky signature -r "HyperV-1-CA.cer" -sv HyperV-1-CA.pvk -e 01/01/2040A Window will open for entering a password for our “Private Key”, to not set it click on “none“, otherwise enter one.
This command, however, will generate a certificate and insert it into the “Trusted Root Certification Authorities\Certificates” of the “LocalMachine”, but the “Private Key” will NOT be imported into the “Windows KeyStore”.
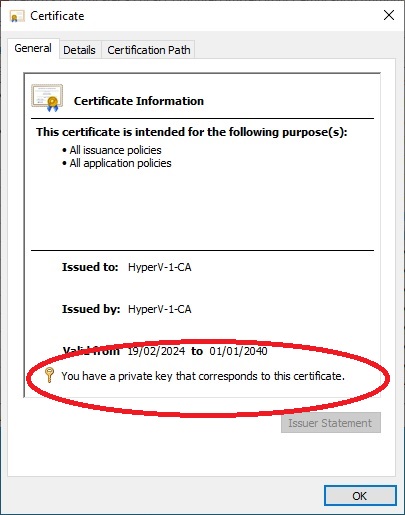
To check whether a certificate present in the machine also has the relevant “Private Key” present in the “Windows KeyStore”, simply open a certificate (you can view them with the Certificate Manager tool certlm.msc) and check that the wording “You have a private key that corresponds to this certificate” is present, if it is not then the relevant “Private Key” is absent.
To insert the “Private Key” and the certificate we must use another tool always present in the Microsoft Windows Software Development Kit (SDK), but we must also install the “Windows SDK for Desktop C++ amd64 apps” package containing the pvk2pfx program. or you can download the executable directly from my github repository here https://github.com/thelogh/self-signed-certificate-replica-Hyper-V.
pvk2pfx command guide https://learn.microsoft.com/en-us/windows-hardware/drivers/devtest/pvk2pfx
This will allow us to combine a “Certificate” (.cer) and a “Private Key” (.pvk), obtaining a “pfx” type certificate (Personal Information Exchange Files) containing everything we need.
We copy the pvk2pfx.exe executable into our “C:\Users\Administrator\Desktop\certificates\” folder
We launch the command to create the “pfx” certificate:
pvk2pfx -pvk HyperV-1-CA.pvk -pi "" -spc HyperV-1-CA.cer -pfx HyperV-1-CA.pfx -po "" -fIn this command the -pi “” field is deliberately empty because no password was set during the generation of the “Private Key”. If one had been set, the chosen password should be written. The -po “” field instead is to specify a password for the “.pfx” certificate which we will not set in this case either. The -f command instead will overwrite the destination file if it already exists.
Or another option, again through makecert we can export the certificate and the “Private Key” in pfx format.
We launch the command to display all certificates in the Root store:
certutil -store RootWe copy the Serial Number: that we are interested in and export everything with the command without password ( -p “” empty):
certutil -exportpfx -p "" Root 33e7ba595950ceb7487bcce7cbc26c94 HyperV-1-CA.pfx norootWe can always export the certificate with the private key via the Certificate Manager tool certlm.msc (very simple and intuitive graphical interface) or Powershell.
Now to import the PFX certificate with the command:
Certutil -enterprise -f -p "" -importpfx Root "HyperV-1-CA.pfx" ExportEncrypted,VSMPay attention to the command, “-enterprise” option accesses a machine enterprise store, “-f” we overwrite the certificate, -p “” we specify if the password to import the PFX certificate is present, “-importpfx” we specify the type of certificate to import, “Root” (Trusted Root Certification Authorities) we specify the position in the store (List of available stores certutil –enumstore), “HyperV-1-CA.pfx” name of the file to import, “ExportEncrypted” we make the private key associated with the exportable, “ VSM” the most important one which stores the private key associated with the imported certificate, otherwise using Certutil the “Private Key” is not imported.
Using Powershell instead with the command:
Import-PfxCertificate -FilePath HyperV-1-CA.pfx -CertStoreLocation Cert:\LocalMachine\Root -ExportableBoth the certificate and the “Private Key” are imported correctly and inserted into the Root store (Trusted Root Certification Authorities), and we make it exportable. In case of PFX certificate with password add “-Password yourpassword” to the command.
Or simply double click on the pfx certificate and the Import Wizards will open.
2 – Powershell
PowerShell is a shell created by Microsoft that is present and can now be installed on all versions of Windows.
To create certificates we will use the native command (cmdlet) New-SelfSignedCertificate.
Microsoft now recommends this method for creating certificates, you can find more information at this link https://learn.microsoft.com/en-us/powershell/module/pki/new-selfsignedcertificate?view=windowsserver2022-ps
Compared to makecert there are more steps but it is also quite quick.
Let’s position ourselves on the first “HyperV-1” server.
Let’s start by creating the “C:\Users\Administrator\Desktop\certificates\” folder for saving certificates as before.
We open a PowerShell window as Administrator and enter the “C:\Users\Administrator\Desktop\certificates\” folder.
Attention! PowerShell by default sets the certificate lifetime to one year.
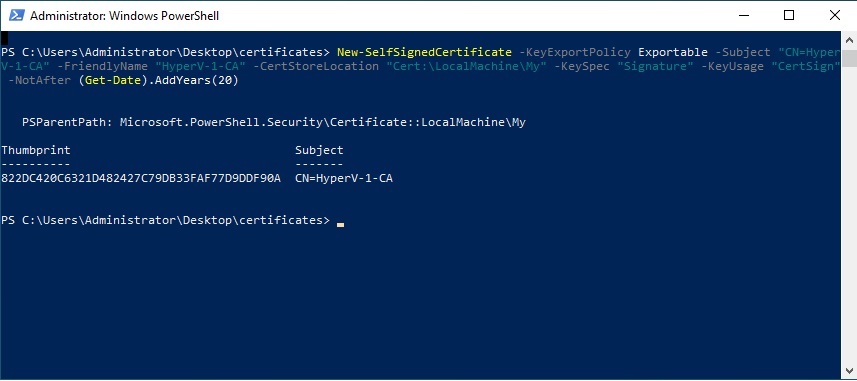
We therefore launch the command for the creation of the CA expiring in 20 years from now, which we will always save in “Local Computer” but not directly in the “Root” but in “My Store“, it cannot be created directly, but subsequently it can be moved.
New-SelfSignedCertificate -KeyExportPolicy Exportable -Subject "CN=HyperV-1-CA" -FriendlyName "HyperV-1-CA" -CertStoreLocation "Cert:\LocalMachine\My" -KeySpec "Signature" -KeyUsage "CertSign" -NotAfter (Get-Date).AddYears(20)Immediately after launching the command, the CA summary and also the “Thumbprint” will be displayed. Make a note of this identifier as we will need it to continue creating self-signed certificates.
If we need to find the “Thumbprint” or view other self-signed certificates present in “My Store“, type in the PowerShell window:
Get-ChildItem -Path Cert:\LocalMachine\MyTo see a detailed list also with certificate expiries:
Get-ChildItem -Path "Cert:\LocalMachine\My" | Select-Object FriendlyName, Thumbprint, Subject, NotBefore, NotAfter, SerialNumberTo see the detail of the individual certificate we must specify its “Thumbprint” with the command:
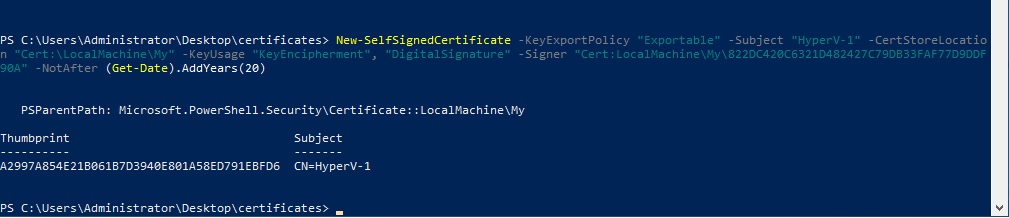
Get-ChildItem -Path "Cert:\LocalMachine\My" | Where-Object Thumbprint -eq 822DC420C6321D482427C79DB33FAF77D9DDF90A | Select-Object *Attention! To generate our authentication certificates we must specify their use in the creation as in makecert:
Server Authentication (1.3.6.1.5.5.7.3.1) = “KeyEncipherment“
Client authentication (1.3.6.1.5.5.7.3.2) = “DigitalSignature“
We now generate the Server certificates by specifying the “Thumbprint” of the CA that will sign it, and giving the certificate an expiration of 20 years from now, with the command:
New-SelfSignedCertificate -KeyExportPolicy "Exportable" -Subject "HyperV-1" -CertStoreLocation "Cert:\LocalMachine\My" -KeyUsage "KeyEncipherment", "DigitalSignature" -Signer "Cert:LocalMachine\My\822DC420C6321D482427C79DB33FAF77D9DDF90A" -NotAfter (Get-Date).AddYears(20)The summary of the Server certificate and also the “Thumbprint” will be displayed.
Now let’s set the CA (HyperV-1-CA) created as authoritative by moving it from “My Store” to “Root” with the command:
Move-Item -Path "Cert:LocalMachine\My\822DC420C6321D482427C79DB33FAF77D9DDF90A" -Destination "Cert:\LocalMachine\Root"We export the “HyperV-1” CA certificate and then import it onto the “HyperV-2” server, type:
Export-Certificate -Cert Cert:\LocalMachine\Root\822DC420C6321D482427C79DB33FAF77D9DDF90A -FilePath C:\Users\Administrator\Desktop\certificates\HyperV-1-CA.cerIf everything went well, the “certificates” folder on the desktop should contain our CA file.
We also carry out the certificate generation procedure on the “HyperV-2” server
I generate the CA:
New-SelfSignedCertificate -KeyExportPolicy Exportable -Subject "CN=HyperV-2-CA" -FriendlyName "HyperV-2-CA" -CertStoreLocation "Cert:\LocalMachine\My" -KeySpec "Signature" -KeyUsage "CertSign" -NotAfter (Get-Date).AddYears(20)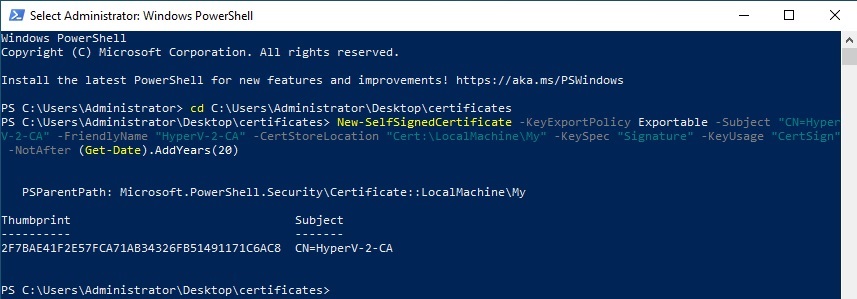
I generate the server certificate:
New-SelfSignedCertificate -KeyExportPolicy "Exportable" -Subject "HyperV-2" -CertStoreLocation "Cert:\LocalMachine\My" -KeyUsage "KeyEncipherment", "DigitalSignature" -Signer "Cert:LocalMachine\My\2F7BAE41F2E57FCA71AB34326FB51491171C6AC8" -NotAfter (Get-Date).AddYears(20)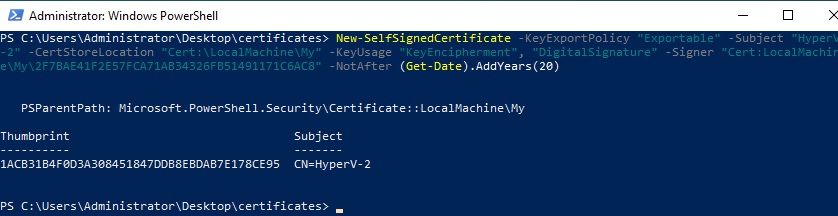
I move the CA certificate to the Root:
Move-Item -Path "Cert:LocalMachine\My\2F7BAE41F2E57FCA71AB34326FB51491171C6AC8" -Destination "Cert:\LocalMachine\Root"I export the “HyperV-2” CA to a file:
Export-Certificate -Cert Cert:\LocalMachine\Root\2F7BAE41F2E57FCA71AB34326FB51491171C6AC8 -FilePath C:\Users\Administrator\Desktop\certificates\HyperV-2-CA.cerNow we can copy the “HyperV-2” CA (HyperV-2-CA.cer) on the “HyperV-1” server to the “C:\Users\Administrator\Desktop\certificates” folder and import it with the command:
Import-Certificate -CertStoreLocation Cert:\LocalMachine\Root -FilePath HyperV-2-CA.cer
Let’s import the “HyperV-1” CA certificate into “HyperV-2”:
Import-Certificate -CertStoreLocation Cert:\LocalMachine\Root -FilePath HyperV-1-CA.cerAttention! As with makecert, during the creation of the certificate the “Private key” is automatically inserted into the “Windows KeyStore” and not exported!
In Powershell, to export the certificates in the Pfx format containing the “Private Key”, issue the command:
Get-ChildItem -Path Cert:\LocalMachine\Root\822DC420C6321D482427C79DB33FAF77D9DDF90A | Export-PfxCertificate -FilePath HyperV-1-CA.pfx -Password (ConvertTo-SecureString -String '12345678' -AsPlainText -Force)We will specify the “Thumbprint” of the interested certificate and we will necessarily have to set a password(12345678), which will be proposed to us again during the import.
In Powershell, to Import the certificates in the Pfx format:
Import-PfxCertificate -FilePath HyperV-1-CA.pfx -CertStoreLocation Cert:\LocalMachine\Root -ExportableVerify that the certificates have appeared using the certlm.msc command as in the makecert example.
3 – OpenSSL
It is the most used certificate creation tool in the world, I believe, there are thousands of guides for using it in Linux, but very few for Microsoft Windows.
Let’s start first with a step-by-step guide to install and configure OpenSSL on Microsoft Windows Server 2022.
First of all we download the installation program for Windows from the site https://slproweb.com/products/Win32OpenSSL.html.
On the site there are versions of “Win64 OpenSSL v3.2.1” weighing approximately 200MB and the “Win64 OpenSSL v3.2.1 Light” version weighing 5MB. We can also download the “Light” version which already includes everything necessary, in this case I will download the “HyperV-1” executable “Win64OpenSSL_Light-3_2_1.exe” on the main server.
Installation on Windows requires the additional libraries “Microsoft visual c++ 2015 to 2022 redistributable package“, during installation if they are not present it will ask us to download them from this link https://aka.ms/vs/17/release/vc_redist.x64.exe
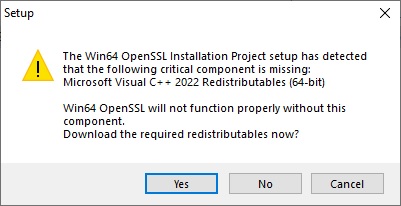
Let us therefore first proceed with the additional libraries Microsoft visual c++ 2015 to 2022 redistributable package” if not installed, after which we launch the installer “Win64OpenSSL_Light-3_2_1.exe“
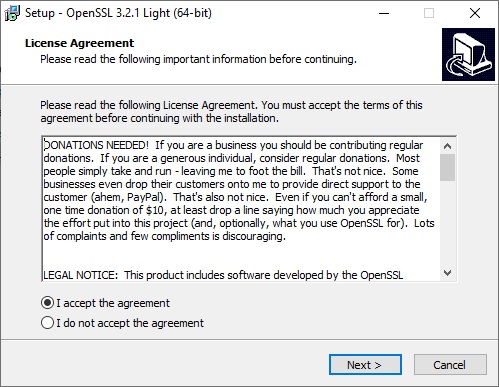
In the first screen we check “I accept the agreement” and click “Next“.
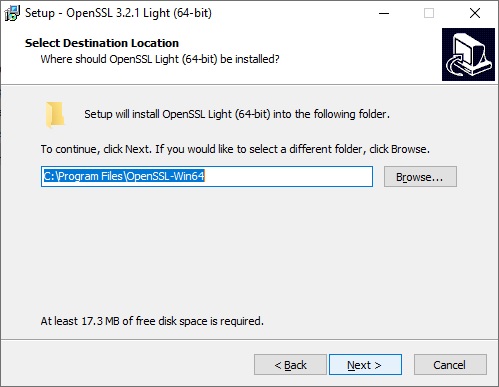
We leave the default installation path “C:\Program Files\OpenSSL-Win64” and click “Next“.
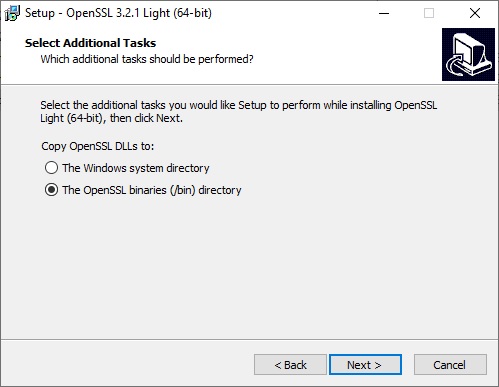
We now select “The OpenSSL binaries(/bin) directory” for the “Copy OpenSSL DLLs to:” option and click “Next“.
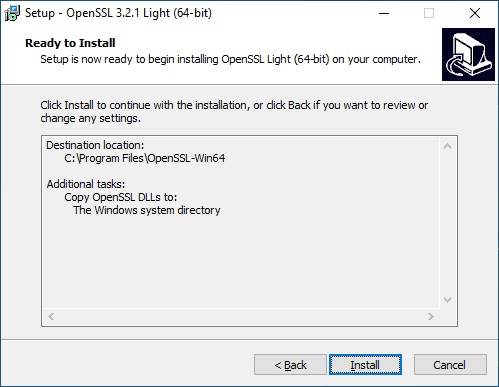
In the summary window, click on “Install”
And finally, once the setup is complete, click on “Finish“.
Let’s now configure the system “Environment Variables” on Windows to ensure that the OpenSSL executable is used in any position without specifying the absolute path.
Let’s now configure the system “Environment Variables” on Windows to ensure that the OpenSSL executable is used in any position without specifying the absolute path.
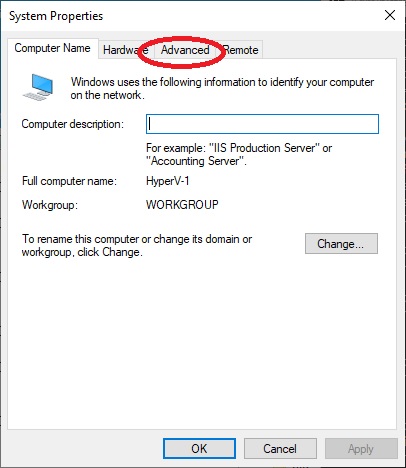
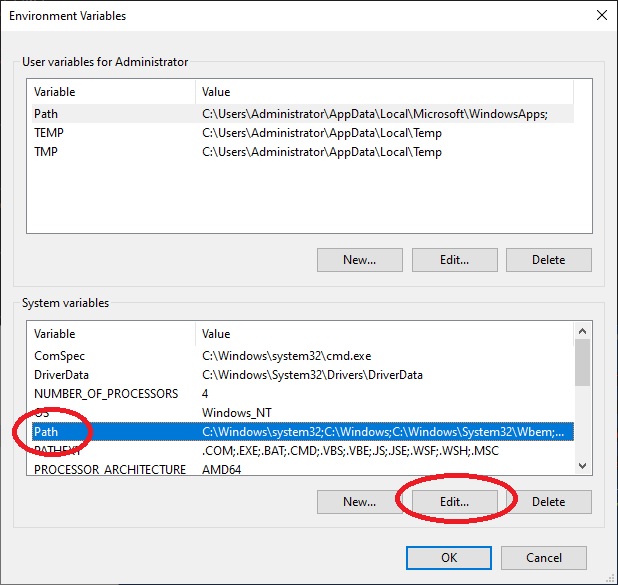
Let’s go to “Settings” > “System” > “About” Click on the right on “Advanced system setting”
The System Properties window will open in the “Advanced” section.
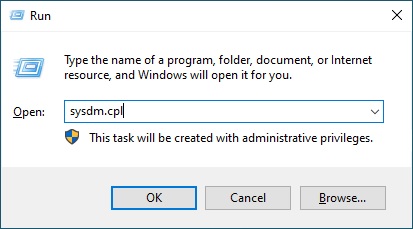
It is possible to open the window directly by launching the command with the ‘Windows’ + ‘r’ keys and writing “sysdm.cpl“
Let’s go to “Advanced”.
Then in “Environment Variable”
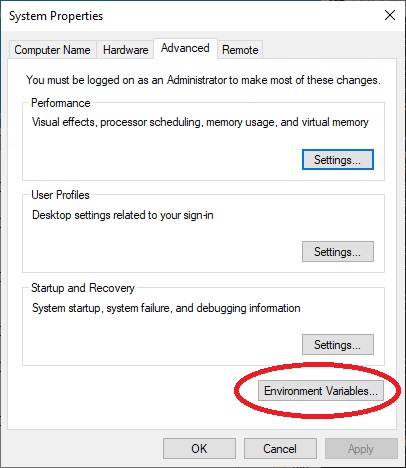
In the opened “Environment Variables” window, select the “Path” line in “System variables” and then click on “Edit”.
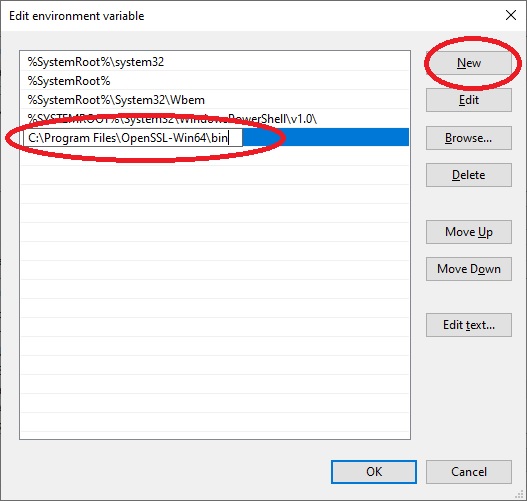
In the “Edit Environment Variable” window, click on “New” insert the OpeSSL installation path “C:\Program Files\OpenSSL-Win64\bin” in the new line and click on “OK”, then again on “ OK“.
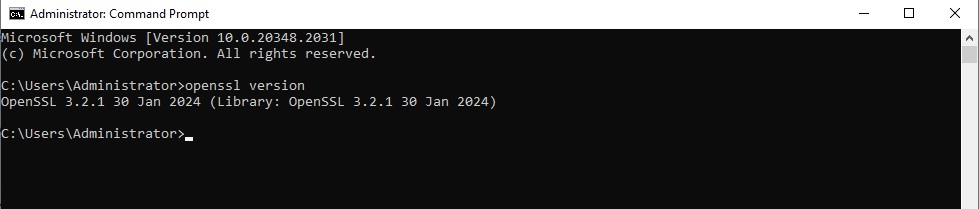
Now we open a command prompt and type “openssl version” if everything has been configured correctly it will show us the installed version of OpenSSL.
Let’s then proceed to create the certificates!
Being an external program, OpenSSL will not copy anything into the “Store Certificate” and the “Windows KeyStore“. We would then have to manually install the Certificate and the “Private Key“.
We open a prompt and enter the certificates folder:
cd “C:\Users\Administrator\Desktop\certificates\”Let’s therefore proceed with the creation of the first “Certification Authority” on the main “HyperV-1” server.
In this case, since the “Private Key” and the “Certificate” will not be inserted automatically, we could simply not install OpenSSL on all servers (HyperV-1, HyperV-2, HyperV-3), but only on the main one “HyperV-1”, and from there generate the certificates and then import them onto the destination servers.
We generate the “Private Key” (HyperV-1-CA.key) For our “CA” with the command:
openssl genrsa -out HyperV-1-CA.key 2048Attention! To generate our authentication certificates we must specify their use in the creation as
Server Authentication (1.3.6.1.5.5.7.3.1) = “serverAuth”
Client authentication (1.3.6.1.5.5.7.3.2) = “clientAuth”
Use the following command to generate the Certificate Signing Request (CSR):
openssl req -new -key HyperV-1-CA.key -subj "/CN=HyperV-1-CA" -addext "keyUsage = keyCertSign" -addext "extendedKeyUsage = serverAuth, clientAuth" -out HyperV-1-CA.csrWe specify the name of the entity with -subj “/CN=HyperV-1-CA” and save the request in the “HyperV-1-CA.csr” file.
We verify our request with the command:
openssl req -in HyperV-1-CA.csr -noout -textLet’s now proceed to signing the certificate:
openssl x509 -req -days 7300 -in HyperV-1-CA.csr -signkey HyperV-1-CA.key -copy_extensions=copyall -out HyperV-1-CA.crtAttention!! Use the “-copy_extensions=copyall” option
otherwise the information in the CSR such as “keyUsage” and “extendedKeyUsage” will not be imported from the created CSR to the certificate!!!!!!!!
The “-days 7300” field specifies in how many days the CA certificate will expire.
We have thus obtained the first certificate of our “Certification Authority” HyperV-1-CA.crt with “Private Key” HyperV-1-CA.key.
There is also another command that automatically generates a certificate without first creating a CSR:
openssl req -x509 -new -nodes -key HyperV-1-CA.key -subj "/CN=HyperV-1-CA" -days 7300 -out HyperV-1-CA.crt -addext "keyUsage = keyCertSign" -addext "extendedKeyUsage = serverAuth, clientAuth"The information that was entered in the CSR is now inserted in the signature request.
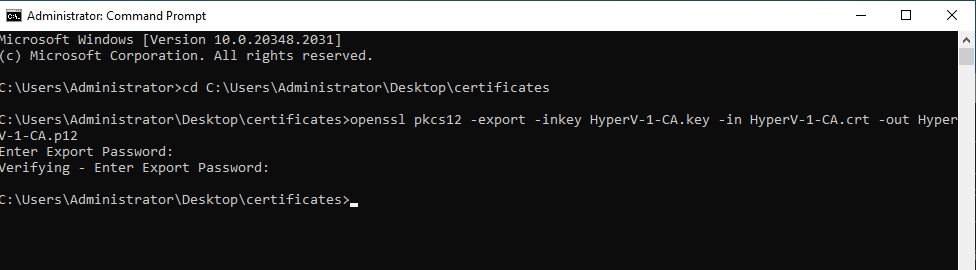
We now generate the PKCS 12 type certificate containing the certificate and “Private Key” to be able to import it onto our servers:
openssl pkcs12 -export -inkey HyperV-1-CA.key -in HyperV-1-CA.crt -out HyperV-1-CA.p12We will be asked to enter a “password“, if we don’t want to set one, press enter.
We now generate the Server Certificate, as before we generate a “Private Key”:
openssl genrsa -out HyperV-1.key 2048Use the following command to generate the Certificate Signing Request (CSR):
openssl req -new -key HyperV-1.key -subj "/CN=HyperV-1" -addext "keyUsage = digitalSignature, keyEncipherment" -addext "extendedKeyUsage = serverAuth, clientAuth" -out HyperV-1.csrAttention! We specify the server name -subj “/CN=HyperV-1” which must match the host name (HyperV-1)! And of course the intended use of the certificate (serverAuth, clientAuth).
CSR Verification:
openssl req -in HyperV-1.csr -noout -textNow proceed to signing the certificate:
openssl x509 -req -in HyperV-1.csr -CA HyperV-1-CA.crt -CAkey HyperV-1-CA.key -CAcreateserial -copy_extensions=copyall -out HyperV-1.crt -days 7300Generate the PKCS 12 type certificate for the “Server” containing the certificate and the “Private key” to be able to import it onto our servers:
openssl pkcs12 -export -inkey HyperV-1.key -in HyperV-1.crt -out HyperV-1.p12We will be asked to enter a “password“, if we don’t want to set one, press enter.
Now that we’re done, all we have to do is generate the “CA” and “Server Certificates” for the other (“HyperV-2”, “HyperV-3”, etc..), and import the certificates with the “Private Key” onto the respective servers.
Once the certificates have been created, we continue with the configuration of the replication service
So on the “HyperV-1” server we will have installed the “CA” called “HyperV-1-CA” and the server certificate called “HyperV-1”, now we should trust the server certificate of “HyperV-2” which will send to the server HyperV-1 for Replica connection.
From the “HyperV-2” server we copy the “CA” certificate (HyperV-2-CA.crt) into the “HyperV-1” server and import it into the “Trusted Root Certification Authorities\Certificates” of the “LocalMachine“. There is no need to import the certificate with the “Private Key” as it will remain safe on our server.
We do the same thing for the “HyperV-2” server, from the “HyperV-1” server we copy the “CA” certificate (HyperV-1-CA.crt) and import it into the “Trusted Root Certification Authorities\Certificates” of the ” LocalMachine”.
Now the certificates exchanged, even if self-signed, will be valid.
Proceed with setting the certificate within Hyper-V.
Go to “Control Panel” > “All Control Panel Items” > “Administrative Tools” and open “Hyper-V Manager“, select the current server in the left column and then click on “Hyper-V Settings“.
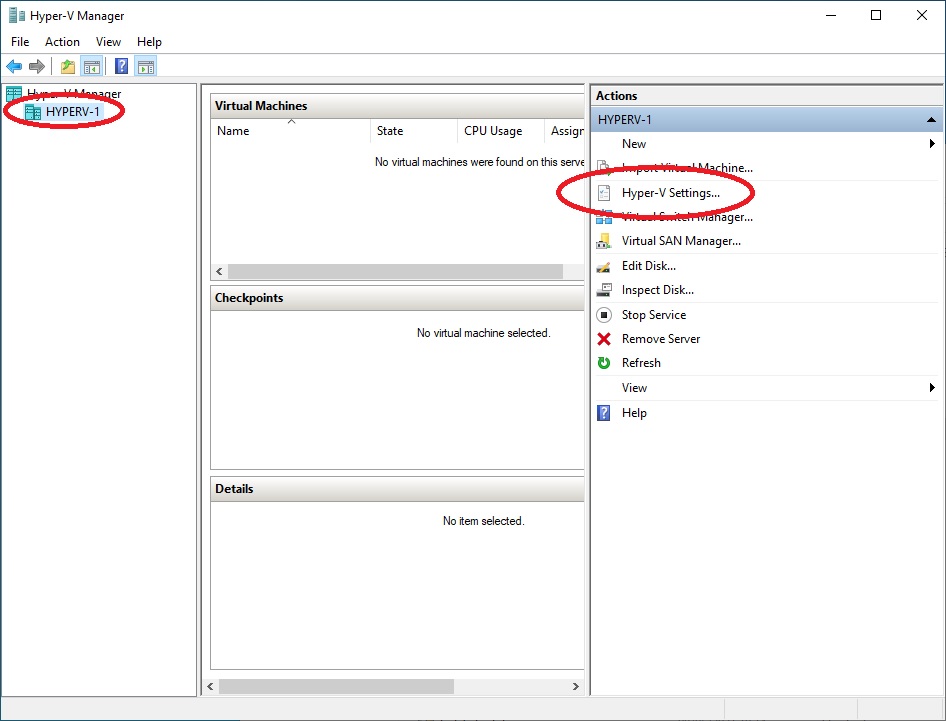
This will open Hyper-V Configuration
Select “Replication Configuration Enables as a Replica server”, check the “Enable this computer as a Replica server” option, select the “Use certificate-based Authentication (HTTPS):” option, and then “Select Certificate”.
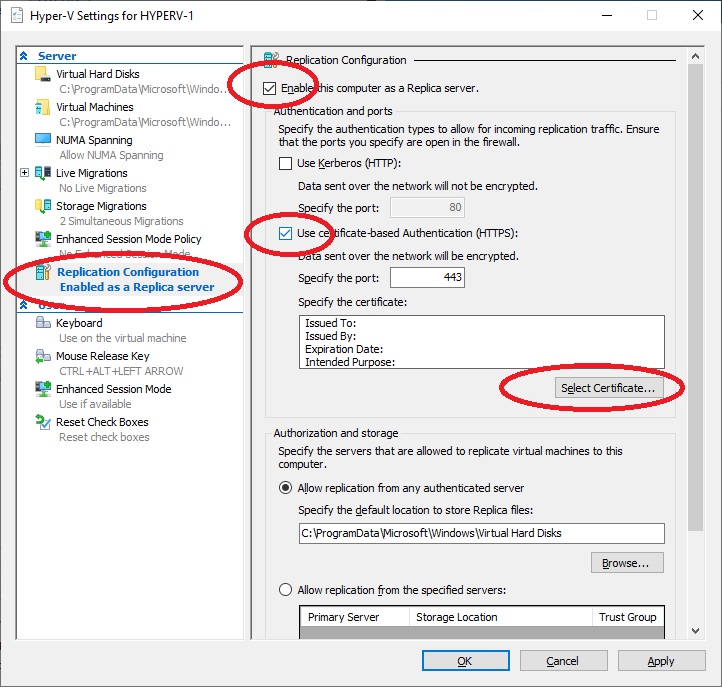
A window will open offering us our server certificate.
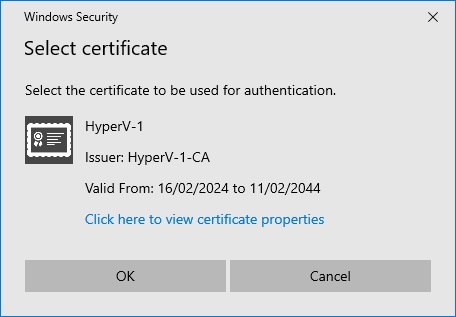
Click “OK” and close the “Hyper-V Settings” window with “OK”.
Perform the same procedure on the HyperV-2 server.
Create a simple VM on Hyper V-1 server.
Create a simple VM on the HyperV-1 server, once created, select it and on the right menu click on “Enable Replication”
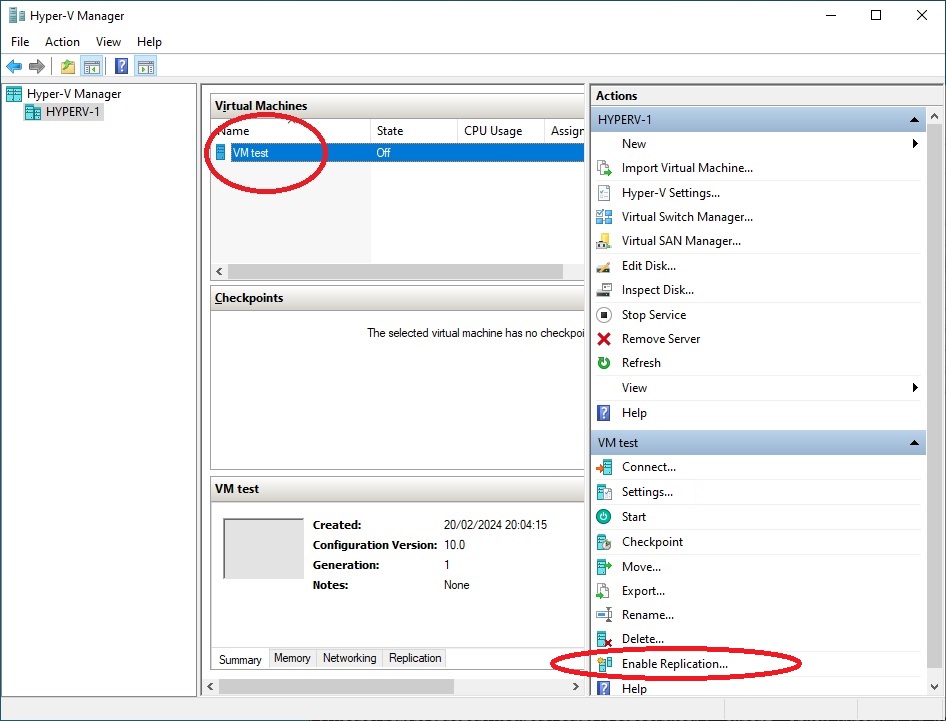
A wizard will open, click on “Next“

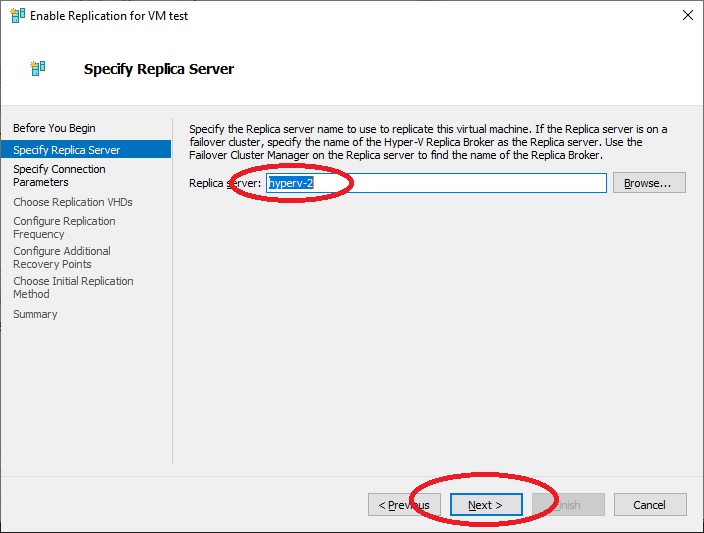
We enter the name of the destination server “HyperV-2” (this is where changes to the hosts file come in handy) and click on “Next”.
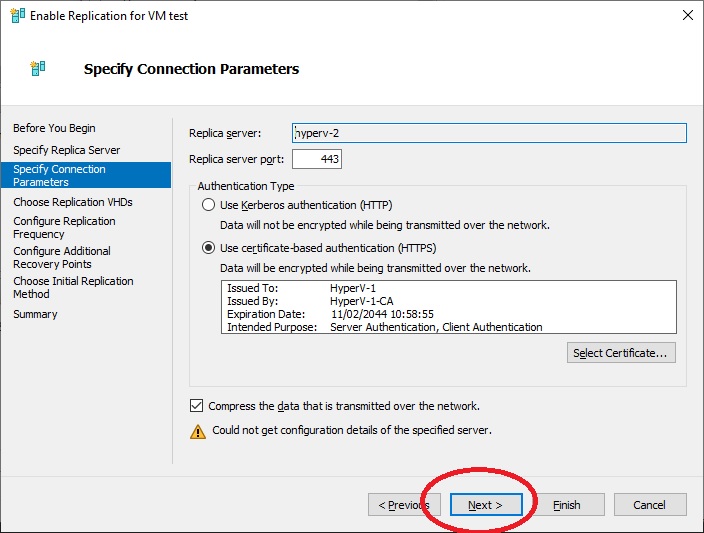
There will be the “Authentication Type” configuration already set on the Certificates. We click on “Next” to configure the replication options or “Finish” to leave the default ones.
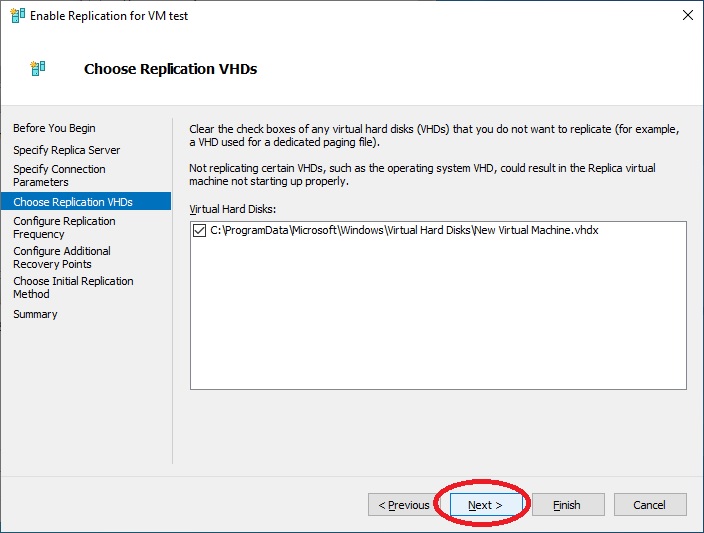
We display the already pre-selected discs that will be replicated, “Next”
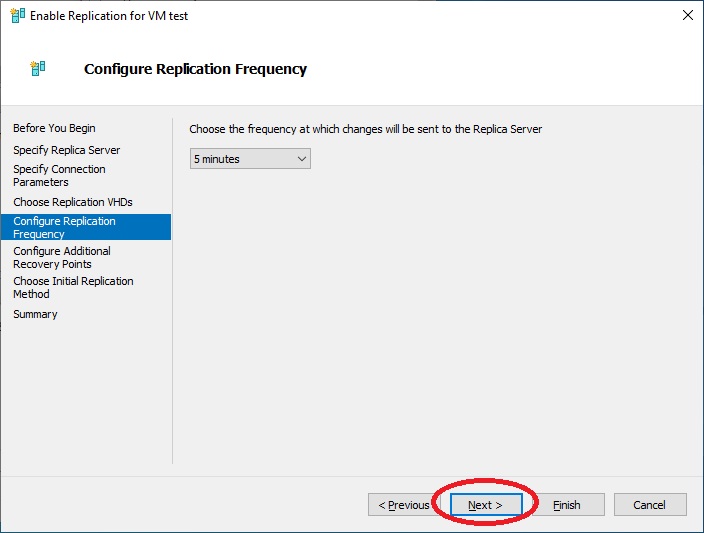
We configure the frequency for the replication, “Next”
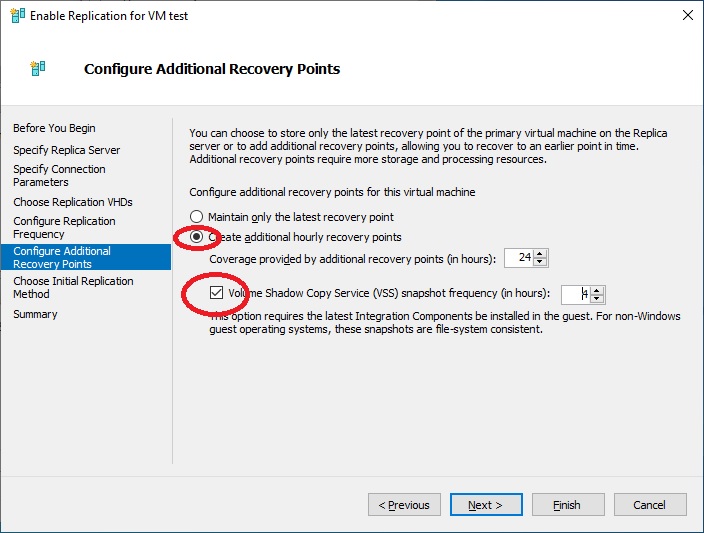
We specify to create additional replicas. A note on the “Volume Shadow Copy Service (VSS) snapshot frequency” option. It is important to install the “Windows Server Backup Feature” on a Windows-based virtual machine to maintain a consistent copy of data, especially for databases.
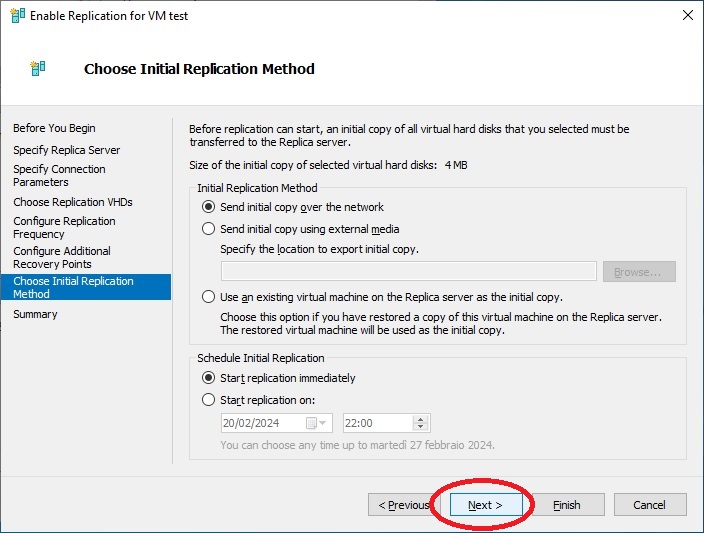
Now we will be asked how to send the data for the first time, we leave everything as default to transfer the copy via the network and to start the replication immediately, “Next“
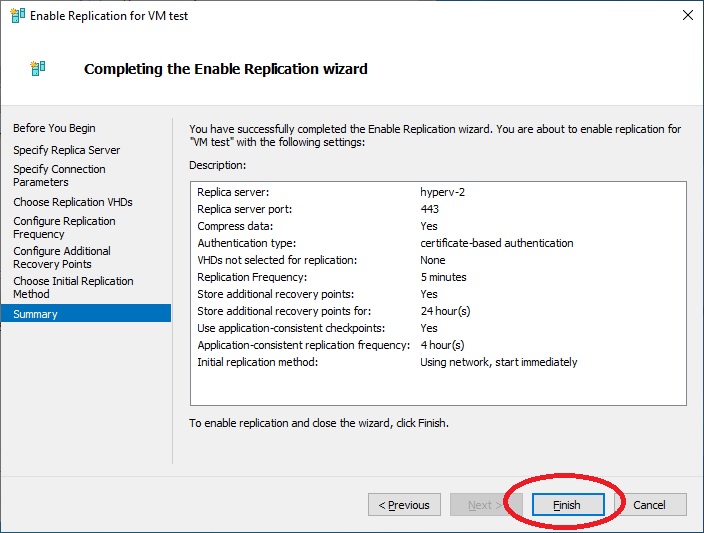
A summary will be displayed, click on “Finish” to start the replication immediately.
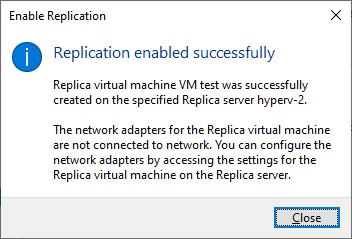
If everything is successful, the success message will appear.
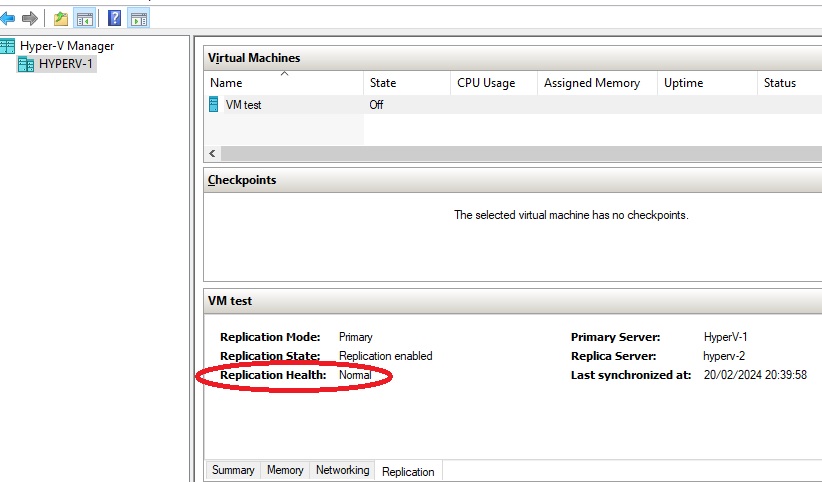
In the Hyper-V Manager screen we can see “Replication Health” Normal in the replication menu
Let’s move to the Hyperv-2 server, open “Hyper-V Manager” and we can see that the VM created on the main server has appeared.
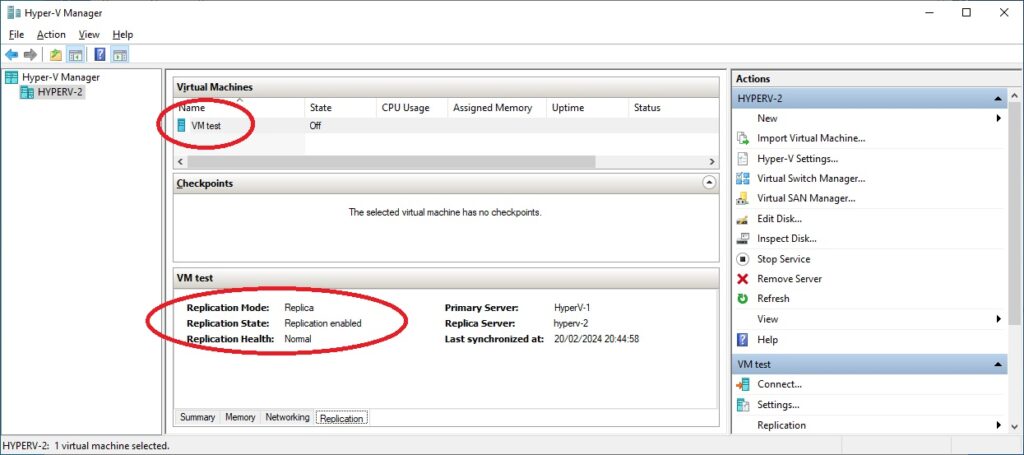
Congratulations, the replication configuration was successful.
You can find the executables and commands used on GitHub in my repository here https://github.com/thelogh/self-signed-certificate-replica-Hyper-V
Now, however, from personal experience I can tell you that sometimes the replication can be interrupted for various reasons, perhaps you have left one or more snapshots active on the main VM and you have restored not the last snapshot but the penultimate one for testing. And the replication can be interrupted silently, generating warnings in the events but nothing more, sometimes the status is normal on one server but not on the other.
So I created a script that checks the replication status and sends an alert email. I recommend installing the script on each server, because sometimes, as previously mentioned, it can be active on one server but in error on another.
The installation procedure is simple, we create a folder where we can save the script such as “C:\Hyper-V\” and copy the “Replica_Check.ps1” file inside it
We open “Task Scheduler” in “Control Panel” > “All Control Panel Items” > “Administrative Tools“
Select “Task Scheduler Library” on the right menu click on “Create Task”
We insert Replica check in the “Name”, select “Run whether user is logged on or not”, select “Run with highest privileges”.

We click on “Triggers” then on “New” and set “Begin the task” to “On a schedule”, “Settings” to “Daily”, in “Advanced settings” we check “Enable”, “Repeat task every: ” we set it to “1 hour”, and we set “for a duration of:” to “Indefinitely”.

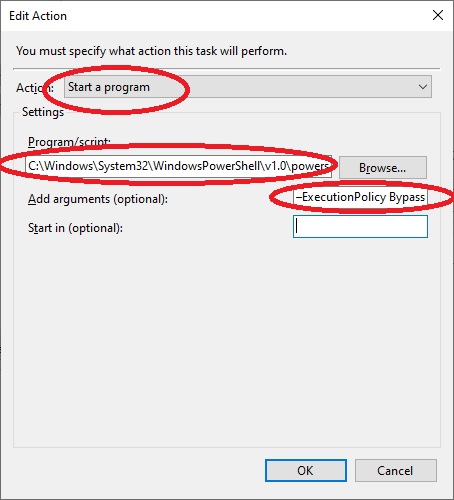
We go to the “Action” menu then click on “New”, in “Action:” select “Start a program”
In “Program/script:” we insert the path of the powershell executable
“C:\Windows\System32\WindowsPowerShell\v1.0\powershell.exe”
In “Add arguments (optional):” we insert “–ExecutionPolicy Bypass C:\Hyper-V\Replica_Check.ps1”
We click on “OK” and we are ready
We click on ok and we are ready
Now in the case of “Warning” or “Critical” level alerts you will receive an email immediately.
Open the script with a text editor and customize it, just set the smtp parameters and uncomment the options for “smtp.EnableSSL” and “smtp.Credentials” in case there is an authentication for the outgoing smtp server.
#Huper-V Replica script by Thelogh
#How to set up replication on Hyper-V 2022 [step by step] with Active Directory off-domain self-signed certificates
#https://www.alldiscoveries.com/how-to-set-up-replication-on-hyper-v-2022-step-by-step-with-active-directory-off-domain-self-signed-certificates
#For all requests write on the blog
#REPOSITORY
#https://github.com/thelogh/self-signed-certificate-replica-Hyper-V
#V.1.0.0
#
#C:\Windows\System32\WindowsPowerShell\v1.0\powershell.exe
#–ExecutionPolicy Bypass C:\Hyper-V\Replica_Check.ps1

if ((Get-VMReplication | select-string -inputobject {$_.Health} -pattern "Warning") -like "Warning")
{
$SMTPServer = "smtp.server.com"
#$SMTPPort = "587"
$SMTPPort = "25"
$Username = "info@example.com"
$Password = "password"
$to = "info@example.com"
$subject = "Replica WARNING error on the server HYPER-V"
$body = "Replica WARNING error on the server HYPER-V"
$message = New-Object System.Net.Mail.MailMessage
$message.subject = $subject
$message.Body = $body
$message.to.add($to)
$message.from = $username
#FIX MESSAGE ID FOR GOOGLE SERVER
$message.Headers.Add( "Message-Id", "<" + [guid]::NewGuid().ToString() + "@example.com>" );
$smtp = New-Object System.Net.Mail.SmtpClient($SMTPServer, $SMTPPort);
#Enable SSL for sending
#$smtp.EnableSSL = $true
#IN CASE OF AUTHENTICATION FOR SENDING MAIL, UNCOMMENT TO SEND USERNAME AND PASSWORD
#$smtp.Credentials = New-Object System.Net.NetworkCredential($Username, $Password);
$smtp.send($message)
}
elseif ((Get-VMReplication | select-string -inputobject {$_.Health} -pattern "Critical") -like "Critical")
{
$SMTPServer = "smtp.server.com"
#$SMTPPort = "587"
$SMTPPort = "25"
$Username = "info@example.com"
$Password = "password"
$to = "info@example.com"
$subject = "Replica CRITICAL error on the server HYPER-V"
$body = "Replica WARNING error on the server HYPER-V"
$message = New-Object System.Net.Mail.MailMessage
$message.subject = $subject
$message.Body = $body
$message.to.add($to)
$message.from = $username
#FIX MESSAGE ID FOR GOOGLE SERVER
$message.Headers.Add( "Message-Id", "<" + [guid]::NewGuid().ToString() + "@example.com>" );
$smtp = New-Object System.Net.Mail.SmtpClient($SMTPServer, $SMTPPort);
#Enable SSL for sending
#$smtp.EnableSSL = $true
#IN CASE OF AUTHENTICATION FOR SENDING MAIL, UNCOMMENT TO SEND USERNAME AND PASSWORD
#$smtp.Credentials = New-Object System.Net.NetworkCredential($Username, $Password);
$smtp.send($message)
}
It’s not a very complicated script but it’s VERY USEFUL!!
You can also download my script from the github repository here https://github.com/thelogh/self-signed-certificate-replica-Hyper-V.
I hope this guide will be useful to you, I dwelt a bit on certificates but it was necessary.
If you need help or want to give suggestions, feel free to contact me on My Linkedin profile https://www.linkedin.com/in/valerio-puglia-332873125/
on your powershell pfx import, you need to specify the password again. thanks for the help of the article.
You only need to create just one certificate with the Powershell command:
$HyperVHosts = `
“HOST1.mydomain.com”, “HOST1”, `
“HOST2.someotherdomain.com”, “HOST2”
New-SelfSignedCertificate -DnsName $HyperVHosts ….
Then you only need to import one root CA and one Hyper-V replica certificate into all the Hyper-V host/replica servers.
Hi, you can decide whether to create separate CAs and create a single CA, it depends on the configuration and the needs that one has as I wrote in the article, I did not put all the cases in these commands because otherwise it would be too long to read. Thanks anyway for inserting the command in powershell maybe it can be of help to others too.