Let’s set up our Ubuntu 22.04 LTS Server for email notifications, configuring Postfix as relayhost(smarthost).
So as to avoid that programs that use the default Ubuntu email system such as Wazuh, Nut, Smartmontool, script, etc., can send valid emails directly from our server and which are rightly reported as spam.
All pre-configured configuration files are available for download on my github at: https://github.com/thelogh/postfix-smarthost
First of all we always update our system.
Assuming you are root otherwise prepend the command sudo run the command:
apt-get update
apt-get upgrade -y
Now let’s install Postfix with:
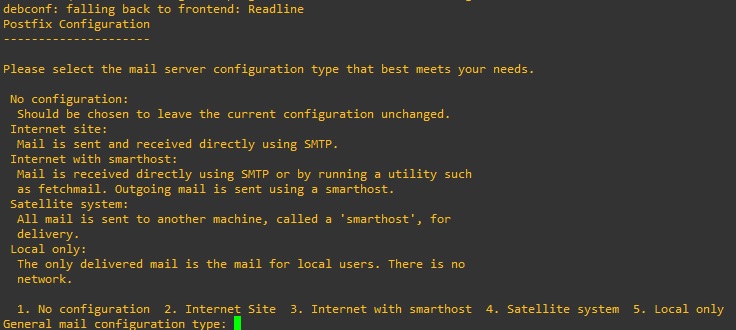
apt-get install mailutils -yOnce installed we will be presented with a configuration choice, select 3 (3. Internet with smarthost), and press enter.
We will be asked for the “System mail name:”, you do not necessarily need to enter a full name of your domain that is also valid outside your network. The name will be used in the “header” of the message and perhaps you will need it to identify it in the mailserver logs.
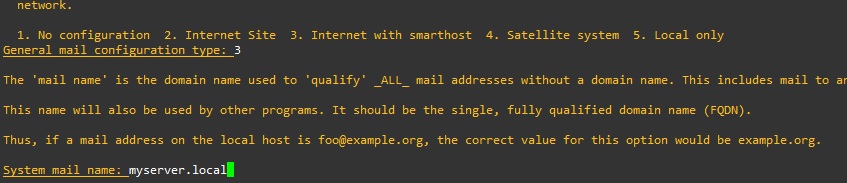
System mail name: myserver.localIn the “SMTP relay host (blank for none):” field, enter your mail server that you will use to send emails, for example Gmail
SMTP relay host (blank for none): smtp.gmail.comIn the event that there were errors in entering the data, you can proceed with the reconfiguration with the command:
dpkg-reconfigure postfixOnce the configuration is complete, we proceed with the configuration of the Postfix service.
We install the authentication module for Postfix, without this it is impossible to authenticate to send emails to the external SMTP server.
apt-get install libsasl2-modules -yEdit the configuration file in /etc/postfix/main.cf.
We enable authentication:
#ENABLE AUTHENTICATION
smtp_sasl_auth_enable = yes
Let’s set up security:
#DISALLOW METHODS THAT ALLOW ANONYMOUS AUTHENTICATION
smtp_sasl_security_options = noanonymous
Configure the access data, we specify not to use a mapping file and insert the static prefix and after the access data (username:password) to the external SMTP server:
#static:USERNAME:PASSWORD
smtp_sasl_password_maps = static:you@gmail.com:password-gmail-here
If instead we want to use a mapping file, and insert the data into a separate file, we modify the configuration like this:
#MAPS FILE
smtp_sasl_password_maps = hash:/etc/postfix/sasl_passwd
We create the map file in /etc/postfix/sasl_passwd and insert inside:
#YOU CAN ALSO SPECIFY THE PORT
smtp.gmail.com:587 you@gmail.com:password-gmail-here
We also generate the database for postfix here:
postmap /etc/postfix/sasl_passwdWe modify the relayhost specifying the port in this case 587 (TLS)
relayhost = smtp.gmail.com:587We restrict the connection to the loopback interface only
inet_interfaces = loopback-onlyPostfix may try to connect to the server with the ipv6 protocol and have problems. To prevent the ipv6 connection error “postfix/smtp[11894]: connect to smtp.gmail.com[2a00:1450:400c:c07::6c]:587: Network is unreachable” if not used, enable the protocol only ipv4 with:
inet_protocols = ipv4We restart the mail service to apply the changes.
systemctl restart postfixWe are almost there now the system is ready to send emails. We can send a test email and see the result with:
echo "MESSAGE" | mail -s "object test" you@gmail.comWe check the postfix logs to check that there are no errors
journalctl -u postfix@-.serviceYes works!!
postfix/smtp[12550]: 90C78D001C4: to=you@gmail.com relay=smtp.gmail.com[142.250.110.109]:587, delay=1.6, delays=0.11/0.11/0.68/0.65, dsn=2.0.0, status=sent (250 2.0.0 OKIn case there have been errors and changes have been made to the postifx configuration, to force the sending of the emails left waiting to be sent, issue the command:
postqueue -fBut now let’s analyze the email that arrived. The sender’s email is correct, but the username of the user who sent the message is inserted next to the email address, in this case “root”. By analyzing the message header we can see:
From: root <you@gmail.com>
X-Google-Original-From: root <root@myserver.local>
It is not very practical or elegant, also because we could use the same email for multiple servers. So we change the sender name so we can better distinguish the emails received. So first of all we change the sender email address of all outgoing emails from our server. Let’s create a conversion map in /etc/postfix/sender_canonical and insert our rule:
/.+/ you@gmail.comFrom the newly created file, we generate the file with the database that will use postfix with the postmap command:
postmap /etc/postfix/sender_canonicalWe change the sender in the HEADER of the message by creating the file in /etc/postfix/header_checks and inserting:
/From:.*/ REPLACE From: Myserver <you@gmail.com>We also generate the database for postfix here:
postmap /etc/postfix/header_checksNow we insert our new directives into the postfix configuration file, edit the file /etc/postfix/main.cf and insert:
#I CHANGE THE ENVELOPE SENDER ADDRESSES AND TO HEADER SENDER
sender_canonical_classes = envelope_sender, header_sender
#CANONICAL MAPS
sender_canonical_maps = regexp:/etc/postfix/sender_canonical
#REWRITING IN THE HEADER
smtp_header_checks = regexp:/etc/postfix/header_checks
Final file configured:
# See /usr/share/postfix/main.cf.dist for a commented, more complete version


# Debian specific:  Specifying a file name will cause the first
# line of that file to be used as the name.  The Debian default
# is /etc/mailname.
#myorigin = /etc/mailname

smtpd_banner = $myhostname ESMTP $mail_name (Ubuntu)
biff = no

# appending .domain is the MUA's job.
append_dot_mydomain = no

# Uncomment the next line to generate "delayed mail" warnings
#delay_warning_time = 4h

readme_directory = no

# See http://www.postfix.org/COMPATIBILITY_README.html -- default to 3.6 on
# fresh installs.
compatibility_level = 3.6


# TLS parameters
smtpd_tls_cert_file=/etc/ssl/certs/ssl-cert-snakeoil.pem
smtpd_tls_key_file=/etc/ssl/private/ssl-cert-snakeoil.key
smtpd_tls_security_level=may

smtp_tls_CApath=/etc/ssl/certs
smtp_tls_security_level=may
smtp_tls_session_cache_database = btree:${data_directory}/smtp_scache


smtpd_relay_restrictions = permit_mynetworks permit_sasl_authenticated defer_unauth_destination
myhostname = hub
alias_maps = hash:/etc/aliases
alias_database = hash:/etc/aliases
myorigin = /etc/mailname
mydestination = myserver.local, $myhostname, hub, localhost.localdomain, localhost
#DESTINATION SERVER
relayhost = smtp.gmail.com:587
mynetworks = 127.0.0.0/8 [::ffff:127.0.0.0]/104 [::1]/128
mailbox_size_limit = 0
recipient_delimiter = +
#ONLY ENABLE FOR INTERNAL SERVER REQUESTS
inet_interfaces = loopback-only
#ONLY ENABLE IP PROTOCOL IPV4 TO PREVENT ERRORS ON IPV6
inet_protocols = ipv4

#ENABLE AUTHENTICATION
smtp_sasl_auth_enable = yes
#DISALLOW METHODS THAT ALLOW ANONYMOUS AUTHENTICATION
smtp_sasl_security_options = noanonymous
#static:USERNAME:PASSWORD
#smtp_sasl_password_maps = static:you@gmail.com:password-gmail-here
#MAPS FILE
smtp_sasl_password_maps = hash:/etc/postfix/sasl_passwd

#I CHANGE THE ENVELOPE SENDER ADDRESSES AND TO HEADER SENDER
sender_canonical_classes = envelope_sender, header_sender
#CANONICAL MAPS
sender_canonical_maps = regexp:/etc/postfix/sender_canonical
#REWRITING IN THE HEADER
smtp_header_checks = regexp:/etc/postfix/header_checks
I remember that for every change made to the sender_canonical and header_checks files the database for postfix must be regenerated with the postmap command.
We restart the service to apply the changes.
systemctl restart postfixLet’s now test sending emails:
echo "MESSAGE" | mail -s "object test" you@gmail.comAnd the new HEADER is……….
From: Myserver <you@gmail.com>This guide is based on a clean install of Ubuntu server 22.04 LTS.
In case the configuration files have already been modified or otherwise, remove the entire postfix installation and start again from 0 with the command:
systemctl stop postfix
apt-get purge postfix
If anything remains in the /etc/postfix directory, remove it manually, then reinstall it with the command:
apt-get install postfixAnd if necessary, relaunch the command for the basic reconfiguration:
dpkg-reconfigure postfixFinished!
I hope this guide has been useful, I await your comments!
If you need help or want to give suggestions, feel free to contact me on My Linkedin profile https://www.linkedin.com/in/valerio-puglia-332873125/
Hey there just wanted to give you a quick heads up.
The words in your post seem to be running off the screen in Internet explorer.
I’m not sure if this is a format issue or something to
do with web browser compatibility but I thought I’d post to let you
know. The design and style look great though!
Hope you get the problem resolved soon. Kudos
Google will give you an error, if you have 2 step verification on your accounts… So, you will need to follow the link provided by google to reach an app password creation script and Google will auto-generate the password (no spaces, even though they show up in the password) – if you use this password, the error goes away. Thank you so-o-o much for all the advice…